
You edited the photo on your laptop. It looks perfect at full resolution. Then you email it to yourself, open it on your phone, and Instagram squashes it into something soft and grey. That round trip is pointless, because knowing how to post Instagram from desktop removes it entirely. Instagram’s web uploader has handled feed posts since late 2021, and by 2026 the desktop workflow covers far more than most people realize.
The catch is that no single method does everything. Instagram.com handles photos, carousels and video. Meta Business Suite adds Stories, Reels and scheduling. Dedicated social media management tools handle bulk planning and approvals. This guide walks through each one, shows exactly what Instagram desktop posting can and cannot do in 2026, gives you the file specs that prevent failed uploads, and fixes the errors that send people back to their phones.
Key Takeaways
- Yes, it works natively. Any account can post on Instagram from PC or Mac through instagram.com using the Create button, with no extension or download.
- The web uploader has real gaps. Stories, trending audio, interactive stickers and Live are still mobile territory, so plan around them rather than fighting them.
- Meta Business Suite is the free upgrade. It adds Stories, Reels and scheduling up to 75 days ahead, capped at 25 scheduled posts per day.
- Specs decide success. Most failed attempts to upload to Instagram from PC come down to file format, aspect ratio or size, not the platform.
- Desktop wins on batching. Planned feed content, carousels and pre-edited Reels are faster from a computer. Spontaneous content still belongs on the phone.
Can You Post on Instagram From a Computer in 2026?
Yes. You can post on Instagram from a computer using the official web uploader at instagram.com, with no app, extension or workaround. Log in, click Create in the left sidebar, choose your file, write the caption, and publish. Photos, carousels and standard videos all go through this flow on both Windows and Mac.
Browser posting opened in October 2021 and has widened since, but the ceiling has not moved. Instagram web is a publishing tool, not a creation tool. You get cropping, filters, alt text and tagging. You do not get the audio library, AR effects, or Story stickers like the Instagram Story link sticker. The upside is quality, since your original file uploads once with no compression chain.
One marker of how seriously Meta now treats desktop: as of 2026, scheduling through Meta’s own tools is capped at 25 posts per day and 75 days in advance. That is enough for a solo creator to queue two and a half months of content in a single desktop session, which tells you the workflow was built for planners.
How to Post Instagram From Desktop Using Instagram.com
To post Instagram from desktop natively, go to instagram.com, log in, click the Create button in the left sidebar, select your file, crop it, write your caption, and click Share. The whole sequence takes under two minutes. Here is each stage in detail, including the settings people usually miss.
Here is the five-step path from file to published post before we break each stage down.
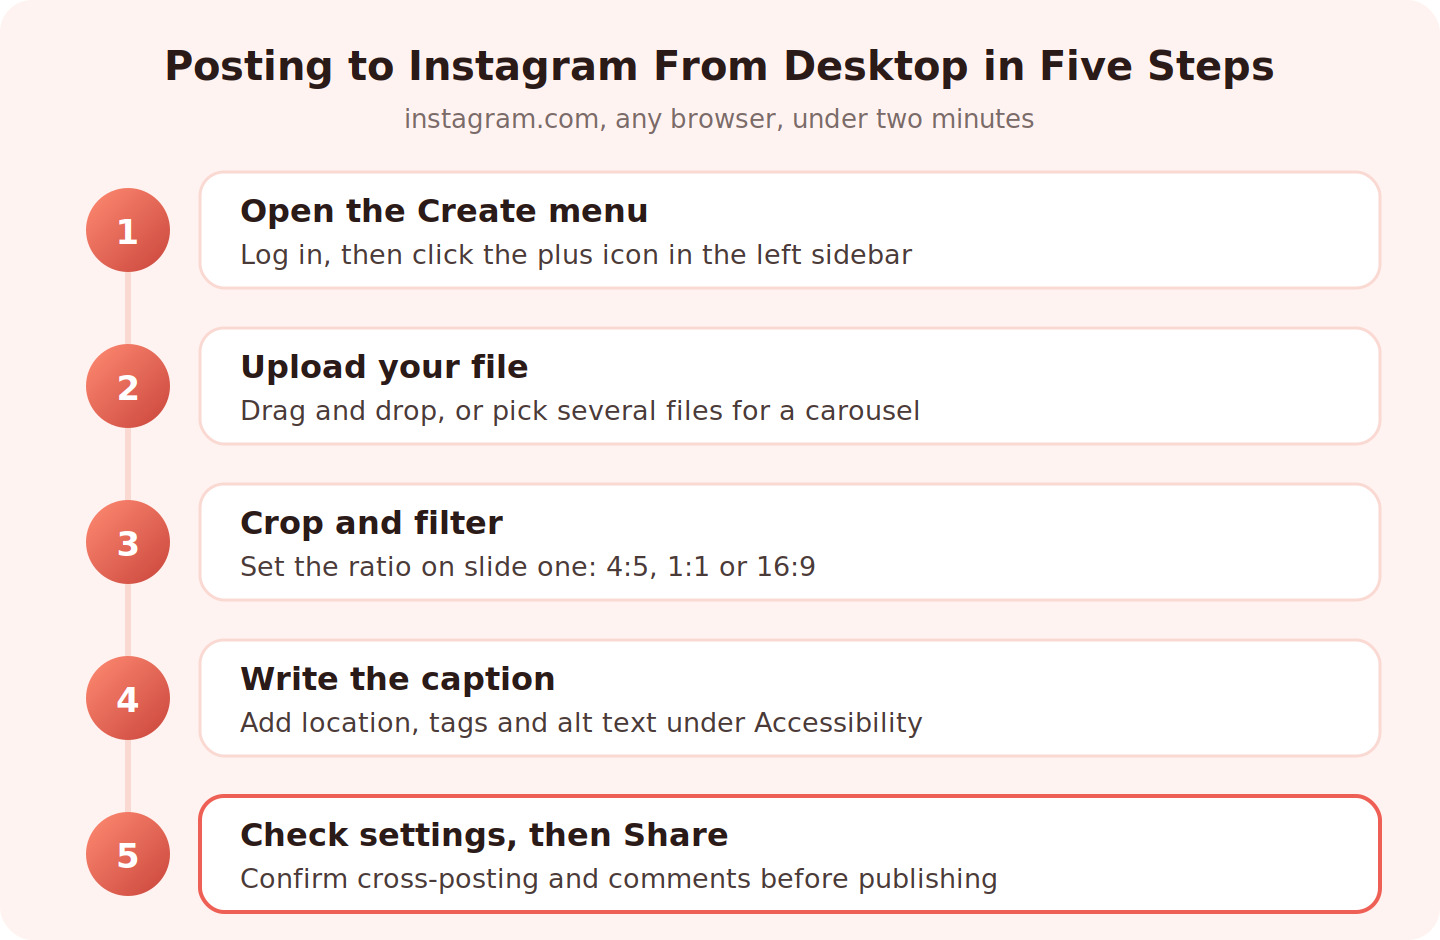
The five steps to upload photos to Instagram from desktop at instagram.com. Steps 3 and 4 are where a computer beats the app, since cropping and captions are easier with a full screen and keyboard.
Only step 5 is one-way. Everything before it can be redone, so settle the ratio and the advanced settings before you click Share, not after.
Step 1: Open the Create Menu
Log into instagram.com in Chrome, Edge, Firefox, Safari or Brave. In the left navigation, below Home, Search and Explore, you will find a plus icon labelled Create. Click it and a Create new post window opens. If the button is missing, your browser window is likely too narrow, because the desktop layout only renders above a certain width.
Step 2: Upload Photos to Instagram From Desktop
Drag files straight into the window or click Select from computer. Choosing more than one file builds a carousel of up to twenty slides. A detail worth knowing: when you mix ratios in a carousel, Instagram forces all slides to the ratio of the first one, so set your intended crop on slide one before adding the rest.
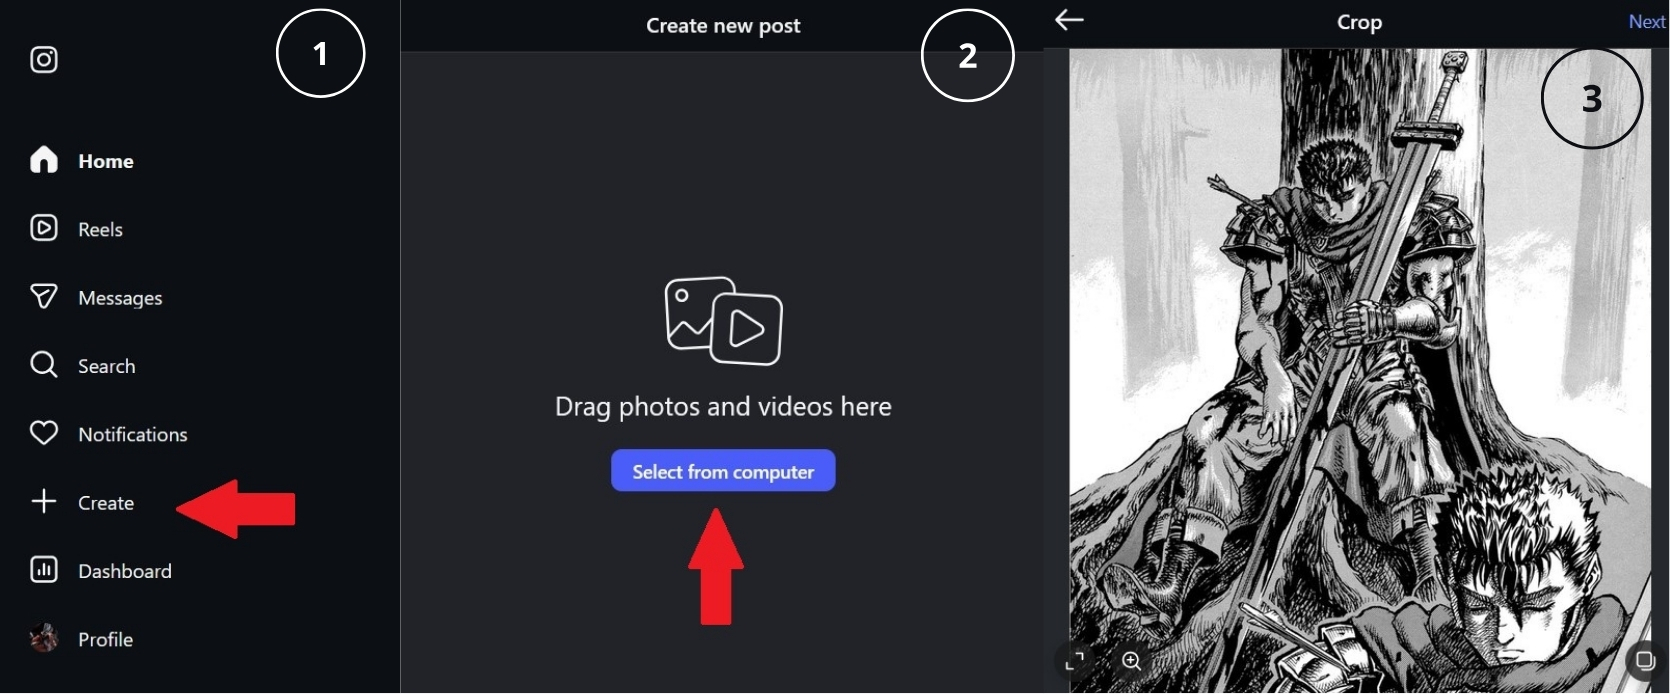
Step 3: Crop, Zoom and Filter
The crop icon in the lower left offers Original, 1:1, 4:5 and 16:9. Pick 4:5 for photos if you want maximum feed real estate. Filters and manual adjustments (brightness, contrast, saturation, fade) sit on the next screen. They are a subset of the mobile options, which matters less if you already colour graded the file elsewhere.
Step 4: Write the Caption and Set Details
This is where desktop earns its keep. A full keyboard means you can draft, proofread and paste a caption without thumb typos. Add your location, tag accounts, and open Accessibility to write alt text, which helps both screen readers and Instagram’s own content understanding. If you want a bank of ready-to-use lines, our collection of Instagram captions pairs well with a desktop drafting habit.
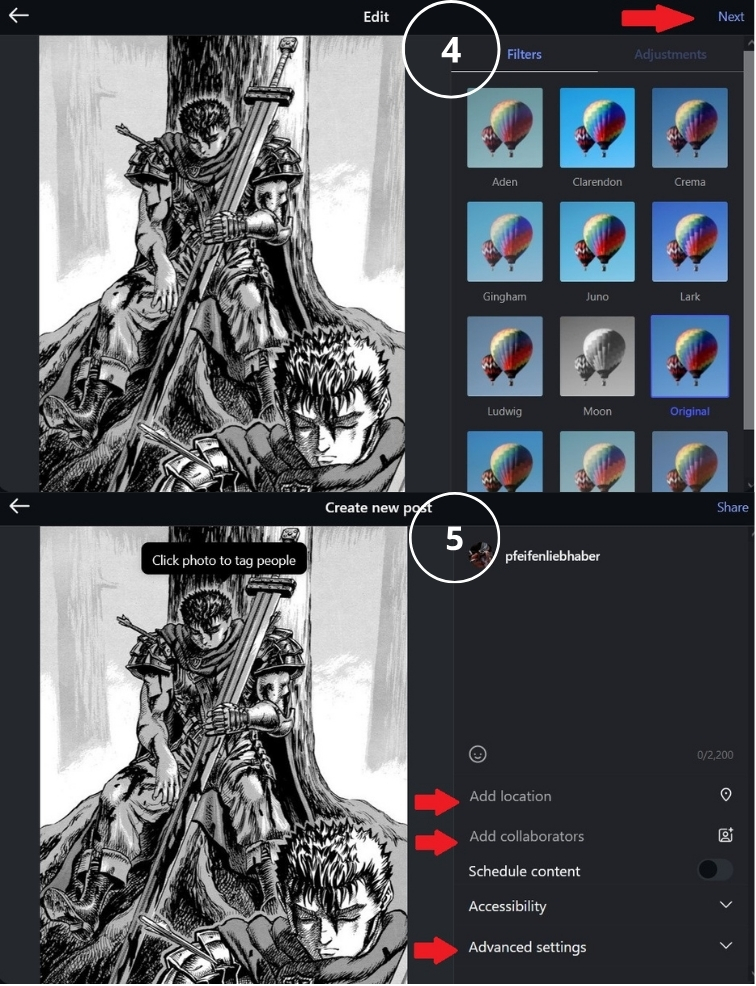
Step 5: Check Advanced Settings, Then Share
Under Advanced settings you can hide like counts, turn off commenting, and control cross-posting to Facebook or Threads. Confirm those before publishing, since some options are harder to change afterwards. Then click Share. The post appears in your grid within seconds.
What Instagram Web Can and Cannot Do
Most frustration with Instagram desktop posting comes from expecting parity with the app. There is none, and knowing the boundary in advance saves an hour of hunting for buttons that do not exist. The table below maps the current split between the browser, Meta Business Suite and the mobile app.
| Task | Instagram.com | Meta Business Suite | Mobile App |
|---|---|---|---|
| Single photo or carousel | Yes | Yes | Yes |
| Feed video upload | Yes | Yes | Yes |
| Stories | No | Yes | Yes |
| Interactive Story stickers | No | No | Yes |
| Trending audio library | No | No | Yes |
| Scheduling | No | Yes | Yes |
| Alt text and accessibility | Yes | Yes | Yes |
| Go Live | Yes | No | Yes |
Read the pattern rather than the individual rows. Everything that is planned, designed and pre-produced works from a computer. Everything that is spontaneous, audio-driven or interactive stays on the phone. That single distinction should shape how you split your week.
How to Post Instagram Stories and Reels From a Computer
Instagram.com does not offer a Story upload option, and it does not surface Reel-specific tools like the audio browser. To post Stories and full Reels when you upload to Instagram from PC, you need Meta Business Suite, a third-party scheduler, or the browser developer trick. Each has a distinct cost.
Method 1: Meta Business Suite
Go to business.facebook.com, confirm your Instagram professional account is linked to your Facebook Page, then choose Create post, Create Story or Create Reel. Upload 9:16 vertical media for Stories, write your text, and either publish or pick a future date. Meta’s own walkthrough of creating and managing posts in Meta Business Suite on desktop covers the current interface. The limitation is creative: you get a static image or video Story, with no polls, questions or countdowns.
Method 2: The Developer Tools Workaround
In Chrome or Edge, log into Instagram, right-click and choose Inspect, click the Toggle device toolbar icon (or press Ctrl+Shift+M, Cmd+Shift+M on Mac), pick any iPhone profile, and refresh. The mobile interface loads inside your browser, plus icon included. In Safari, enable the Develop menu under Settings then Advanced, and choose Enter Responsive Design Mode.
Treat this as an emergency exit, not a workflow. It is unsupported, it breaks without warning when Instagram ships an update, it cannot schedule, and carousel creation through it is unreliable. It is genuinely useful for one thing: a single quick Story from a personal account that has no Business Suite access.
Method 3: A Third-Party Scheduler
Schedulers connect through Meta’s official publishing API and auto-publish Stories, Reels and carousels on a timer. They need a Business or Creator account. The upside is planning: a grid preview, a calendar, and one queue across several networks. The tools section below breaks down which ones are worth the subscription.
If Reels are your priority, one habit solves the biggest gap. The audio library is mobile-only, so add trending sound in a mobile editor or import a licensed track in CapCut before you upload from your desktop. You keep the desktop editing quality and lose nothing on discovery.
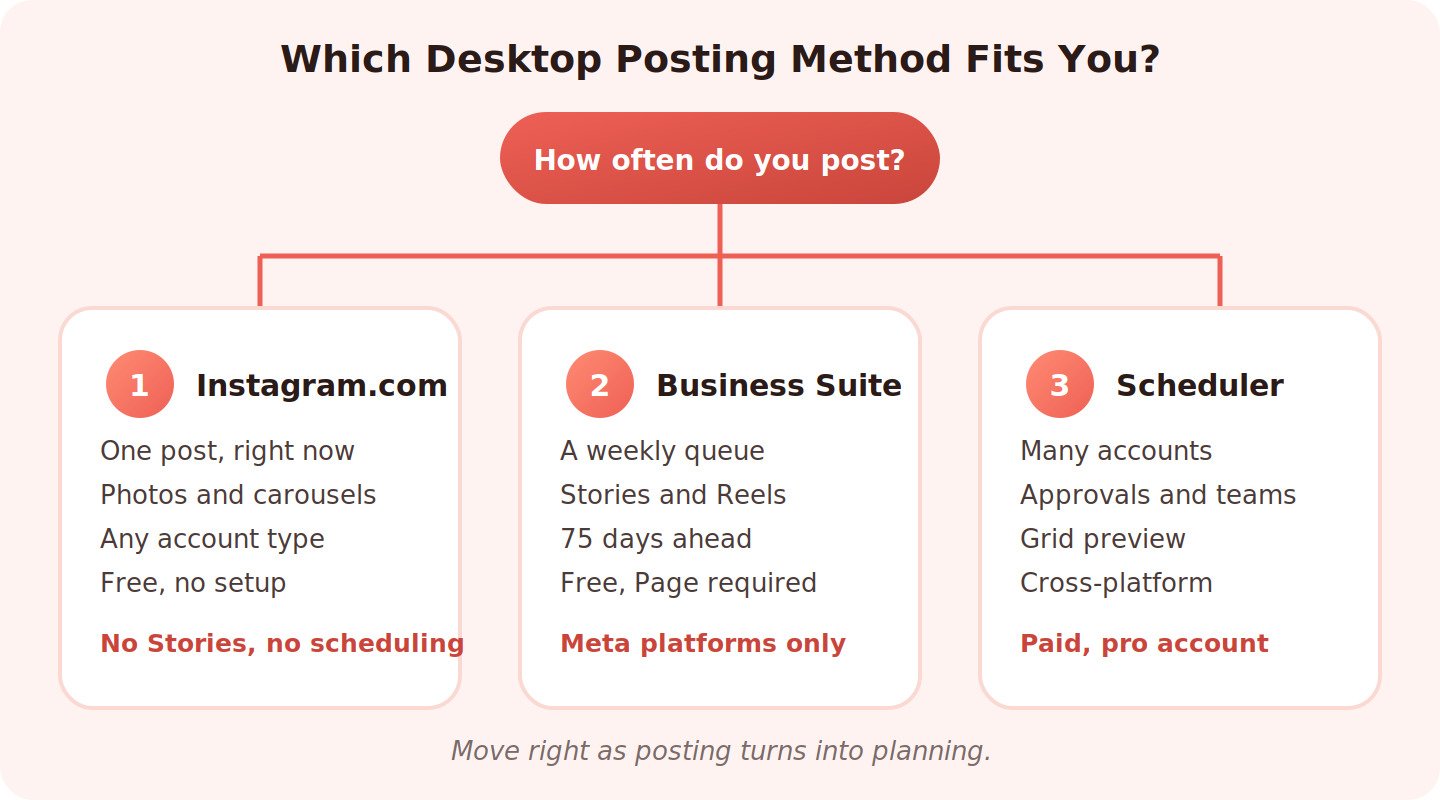
The Instagram desktop posting decision framework. Weekly posting volume, not follower count, picks your method, and each column names the limitation that pushes you to the next one.
The framework is simple because the real trigger is volume, not ambition. One post today means the browser. A weekly queue means Business Suite. Once a second person has to approve anything, a scheduler beats chasing sign-off in a group chat.
5 Tools to Post on Instagram From PC
These five cover the realistic range, from free and native to paid and planned. Each entry explains what the tool actually is before the feature list, so you can rule options out quickly.
Instagram Web Uploader
Instagram’s own browser interface at instagram.com, with a Create button in the sidebar that opens a drag-and-drop upload window. It is the shortest route to post on Instagram from PC because there is nothing to install, connect or authorize beyond your normal login.
Instagram Web Best For: Anyone publishing a single photo, carousel or video today.
Instagram Web Key Features: Drag-and-drop upload, carousels up to 20 slides, crop presets, basic filters, alt text, collaborator tags, cross-post toggles, Live streaming.
- Free and instant
- Works on any account type
- Keeps original file quality
- No Stories
- No scheduling
- No audio or effects library
Instagram Web Pricing: Free.
Recommendation: Start here. Only move on once you catch yourself repeating the same upload three days in a row.
Meta Business Suite
Meta’s free management console for Facebook and Instagram, reachable at business.facebook.com. It is the only native way to publish Stories and schedule Instagram desktop posting, which makes it the natural second step once one-off uploads stop being enough.
Meta Business Suite Best For: Founders and creators who only run Instagram and Facebook.
Meta Business Suite Key Features: Post, Story and Reel composer, scheduling up to 75 days out, calendar planner, unified inbox, insights, cross-posting to Facebook and Threads, custom Reel covers.
- Free with no post limit
- Stories from desktop
- Official API, lowest risk
- Needs a linked Facebook Page
- No visual grid preview
- Interface feels heavy
Meta Business Suite Pricing: Free, with a Business or Creator account required.
Recommendation: The best value on this list. Set it up before paying for anything else, because it removes the two biggest desktop gaps at zero cost.
Pallyy
A visual-first scheduler built around a drag-and-drop grid planner, aimed at creators who care how the feed looks as a whole. It lets you upload to Instagram from PC while seeing exactly how each new tile sits against the last nine, which matters for anyone treating the grid as a portfolio. Our full Pallyy review covers the interface in depth.
Pallyy Best For: Solo creators and small studios who plan a visual grid.
Pallyy Key Features: Grid planner, bulk upload, auto-publishing for posts, Stories and Reels, media library, comment inbox, hashtag manager, analytics.
- Genuinely useful free tier
- Grid preview is best in class
- Priced per social set
- Lighter analytics than rivals
- Fewer team controls
- Instagram-centric by design
Pallyy Pricing: Free plan available, with paid tiers per social set. Check current rates before committing.
Recommendation: Pick this if the look of your grid is part of the product. Skip it if you post reactively.
Metricool
An analytics platform that grew a scheduler, rather than the reverse. It is the option to consider when you want to post on Instagram from a computer and then find out, in the same tab, whether the post was worth publishing. Reporting is the reason to be here.
Metricool Best For: Marketers who report to a client or a boss.
Metricool Key Features: Auto-publishing for posts, Stories, Reels and carousels, best-time heatmap, competitor benchmarking, white-label PDF reports, link in bio, multi-network calendar.
- Reporting depth is excellent
- Competitor tracking included
- Free plan covers one brand
- Dense interface at first
- Composer less polished
- Costs rise with brand count
Metricool Pricing: Free tier plus paid plans scaled by brand count. Confirm current pricing on their site.
Recommendation: Worth it the moment someone asks you to prove the posting is working.
Buffer
A long-running publishing tool that keeps the composer deliberately plain: connect a channel, drop content in a queue, set posting slots, walk away. For teams who mainly need reliable Instagram desktop posting across several networks without a learning curve, that restraint is the feature.
Buffer Best For: Small teams publishing to Instagram plus three or four other platforms.
Buffer Key Features: Queue-based scheduling, channel-specific customization, AI caption assistant, approval workflow on higher tiers, landing pages, engagement inbox, per-channel analytics.
- Fastest tool to learn
- Transparent per-channel pricing
- Reliable auto-publishing
- Analytics are basic
- No deep grid planning
- Costs stack per channel
Buffer Pricing: Free plan for a limited number of channels, then a per-channel monthly fee.
Recommendation: The safe default when you need something working this afternoon and nobody wants training.
One caveat that applies to every paid tool here: they all publish through Meta’s official API, which means a Business or Creator account is mandatory. If you are on a personal profile, the free routes are your routes. Pair whichever tool you pick with solid content creation tools so the scheduler always has something good to publish.
Instagram File Specs for Desktop Uploads
Most failed attempts to upload photos to Instagram from desktop are file problems wearing a platform costume. Get these numbers right before you open the Create window and the failure rate drops close to zero.
| Format | Ratio | Pixels | File Type |
|---|---|---|---|
| Portrait photo | 4:5 | 1080 x 1350 | JPEG or PNG |
| Square photo | 1:1 | 1080 x 1080 | JPEG or PNG |
| Landscape photo | 1.91:1 | 1080 x 566 | JPEG or PNG |
| Reel or Story | 9:16 | 1080 x 1920 | MP4 or MOV |
| Feed video | 4:5 or 1:1 | 1080 wide | MP4 (H.264) |
Two rules do most of the work. Export at exactly 1080 pixels on the short edge, because uploading a 4000-pixel file gains nothing and only invites heavier compression. And convert anything exotic (AVI, WMV, MKV, HEIC) to MP4 or JPEG first, since the web uploader rejects them without a helpful error message.
Fixing Common Instagram Desktop Posting Errors
When something breaks while you post on Instagram from PC, it is almost always one of four things. Work through them in this order.
The Create Button Is Missing
Widen the browser window first, since the Create option only renders in the full desktop layout. If it still fails, sign out completely, clear cookies for instagram.com, and log back in. A private window rules out extension conflicts, which are the usual culprit when one browser works and another does not.
The Upload Stalls or Fails Silently
Check format, then size, then ratio. Instagram accepts MP4 and MOV for video with generous length and size ceilings, so a stalled upload usually means the codec is wrong rather than the file being too big. Re-export as H.264 MP4 and try again.
Your Image Looks Soft After Publishing
Compression is triggered by oversized files and unusual dimensions. Export at 1080 pixels wide, use sRGB rather than Adobe RGB, and save JPEG at high quality instead of maximum. Files that already match Instagram’s target dimensions get re-encoded far more gently.
Action Blocked After Several Posts
Rapid publishing from a new browser session can trigger a temporary block. Stop posting for 24 to 72 hours, avoid repeated login attempts, and clear the browser cache. If it persists, report it through Instagram’s Help Center rather than switching accounts, which tends to make things worse.
Make Every Desktop Post Actually Earn Something
Learning how to post Instagram from desktop solves the workflow problem. It does not solve the money problem. A polished carousel published from your laptop still lands in a feed where you cannot put a clickable link in the caption, which is why adding a link to an Instagram post always routes back through your bio.
That single bio link is the weak point in most desktop workflows. You batch a week of content, every post drives interest, and all of it funnels to one URL that has nothing to do with the specific post someone just saw. The fix is a bio page that maps posts to destinations, so a follower who watched Tuesday’s carousel lands on Tuesday’s product rather than a homepage.
brandID builds that layer on top of whatever posting method you choose. You create a link-in-bio storefront in minutes, organize what you sell into collections by niche, season or campaign, and connect individual social posts to individual products so each post becomes shoppable. Digital products, subscriptions, tips and affiliate products all live on the same page, and the whole thing is managed from the same computer you post from.
If affiliate income is the goal, the marketplace side gives creators access to over 5 million products from more than 2,000 brands, with average commissions reaching up to 65% and some brands paying higher. That range matters because it decides whether a post needs a hundred sales or five to be worth the hour you spent making it. Compare the approach against other link in bio tools before you commit.
Build a bio storefront, link each post to a product, and earn from the content you are already publishing from your computer.
Build Your brandID StorefrontConclusion
Knowing how to post Instagram from desktop is less about finding one perfect method and more about matching the method to the job. Instagram.com covers a single photo or carousel today. Meta Business Suite adds Stories, Reels and a 75-day queue without costing anything. A dedicated scheduler earns its fee once approvals, several accounts or several networks enter the picture.
The gaps that remain are consistent and predictable. Trending audio, interactive stickers, AR effects and Live all still require the phone. Everything else, which is most of what a serious account publishes, is faster and cleaner from a computer with the original files, a real keyboard and a screen you can actually see the crop on.
Run a two-minute audit before you choose. Count how many posts you publish a week, note whether Stories are part of the plan, and check whether anyone else needs to approve content. Those three answers point at exactly one method. Then put the time you save back into the part that compounds, which is what happens after someone taps your bio. Our guide to growing your Instagram following is the natural next step once the posting itself stops being the bottleneck.
Frequently Asked Questions
Why is the Create button missing when I try to post on Instagram from my computer?
Almost always a layout issue. The Create button only appears at desktop window width, so a narrow or zoomed browser hides it. Reset zoom to 100%, maximize the window, and refresh. If that fails, clear cookies for instagram.com and log back in, or open a private window to rule out an extension blocking the sidebar.
Can I post Instagram Stories from a PC without third-party software?
Yes, through Meta Business Suite, which is free and made by Meta. Link your professional account to a Facebook Page, then use Create Story with 9:16 media. The developer tools trick is the only other software-free route, but it is unsupported and cannot schedule. Neither method gives you polls, questions or music stickers.
Does Instagram desktop posting reduce reach compared to posting from the app?
There is no evidence the upload source itself is a ranking factor, and testing on scheduled versus manual posting has found no measurable difference. What does affect reach is format. A desktop Reel without trending audio competes against Reels that have it, so the gap comes from the creative choice, not the device you published from.
Is it safe to use third-party tools to upload to Instagram from PC?
It depends on how they connect. Tools that authorize through Meta’s official publishing API never see your password and are low risk. Anything asking you to type your Instagram username and password directly into its own form is a different proposition entirely. Check for API-based authorization before connecting, and remove access for tools you stop using.
 Summarize this article with: