
Cold outreach has a delivery problem. You find a company worth contacting, hunt for the right email, guess the format, and warm up a domain, and the message still lands in spam or a promotions tab that no one opens. Even best cold email software cannot fully fix a channel that filters and sender reputation quietly throttle.
Meanwhile almost every business keeps a Contact Us form that routes straight to an inbox a person actually reads. Filling thousands of those forms by hand, though, is not a plan.
contactID exists to close that gap. It is a Chrome extension paired with a web dashboard that finds the contact form on any website, fills it in with your details, and submits it for you at scale. Your message arrives as a genuine inquiry, not another cold email fighting a filter.
Everything below walks through how it works, from creating agents to A/B testing, personalized messages, AI credits, and upgrading your plan.
Key Takeaways
- Forms, not inboxes: contactID auto-fills and submits website contact forms, so outreach reaches a monitored inbox instead of a spam folder
- Agents hold your identity: A sender agent stores every detail forms ask for, and a completeness meter shows how many forms it can already handle
- Personalize per website: Merge tags, a 12-template library, and AI-written messages make each submission read as if written for that one site
- A/B test with real splits: Set up more than one profile, rotate sends across them by a percentage you choose, and read the live win rate
- Ten free sends, then upgrade: Every account starts with 10 free successful sends, after which you continue by pay-as-you-go or a subscription
What Is contactID
contactID is an outreach tool built by brandID that specializes in contact form automation: reaching businesses through their own website contact forms.
Instead of sending email that has to survive spam filters, domain reputation, and promotions tabs, it submits a form on the target site. That form typically drops into a monitored inbox, a helpdesk, or a CRM that a human checks. This single change in channel is why form-based outreach often reaches people that cold email never does. Reaching prospects this way, an approach known as contact form marketing, sidesteps the inbox entirely.
Where contactID Lives
It works across two surfaces that share one account. The extension side panel is where sending happens, organized as four steps: Setup, Agent, Targets, and Send.
The web dashboard handles everything around a run: onboarding, analytics, billing, agents, AI personalization, and credits. You can move between the two freely, and the same agents and lists are available in both.
How Does It Work
The flow for every target is the same. contactID opens the site in the background, locates its contact form, and maps each visible field to the matching value in your agent.
It then fills the form, substitutes any merge tags (and writes an AI section if you enabled it), and submits. Every attempt is recorded: whether the form sent, how many fields it filled, how long it took, and a reason if it failed.
Those records feed the analytics you use to tune later runs, so each batch is more informed than the last.
Who It Is For
It fits anyone doing high-volume, business-to-business outreach where the recipient publishes a contact form. That includes agencies pitching services, suppliers seeking placement, recruiters reaching companies, partnership and affiliate teams, and founders prospecting for themselves.
If your list is people with no public form, or you need one-to-one conversations, this is the wrong tool. If your list is hundreds or thousands of company sites, it removes the manual part entirely.
contactID Features
contactID bundles the whole outreach workflow into one extension and dashboard. These are the features that matter most, each covered in detail further on.
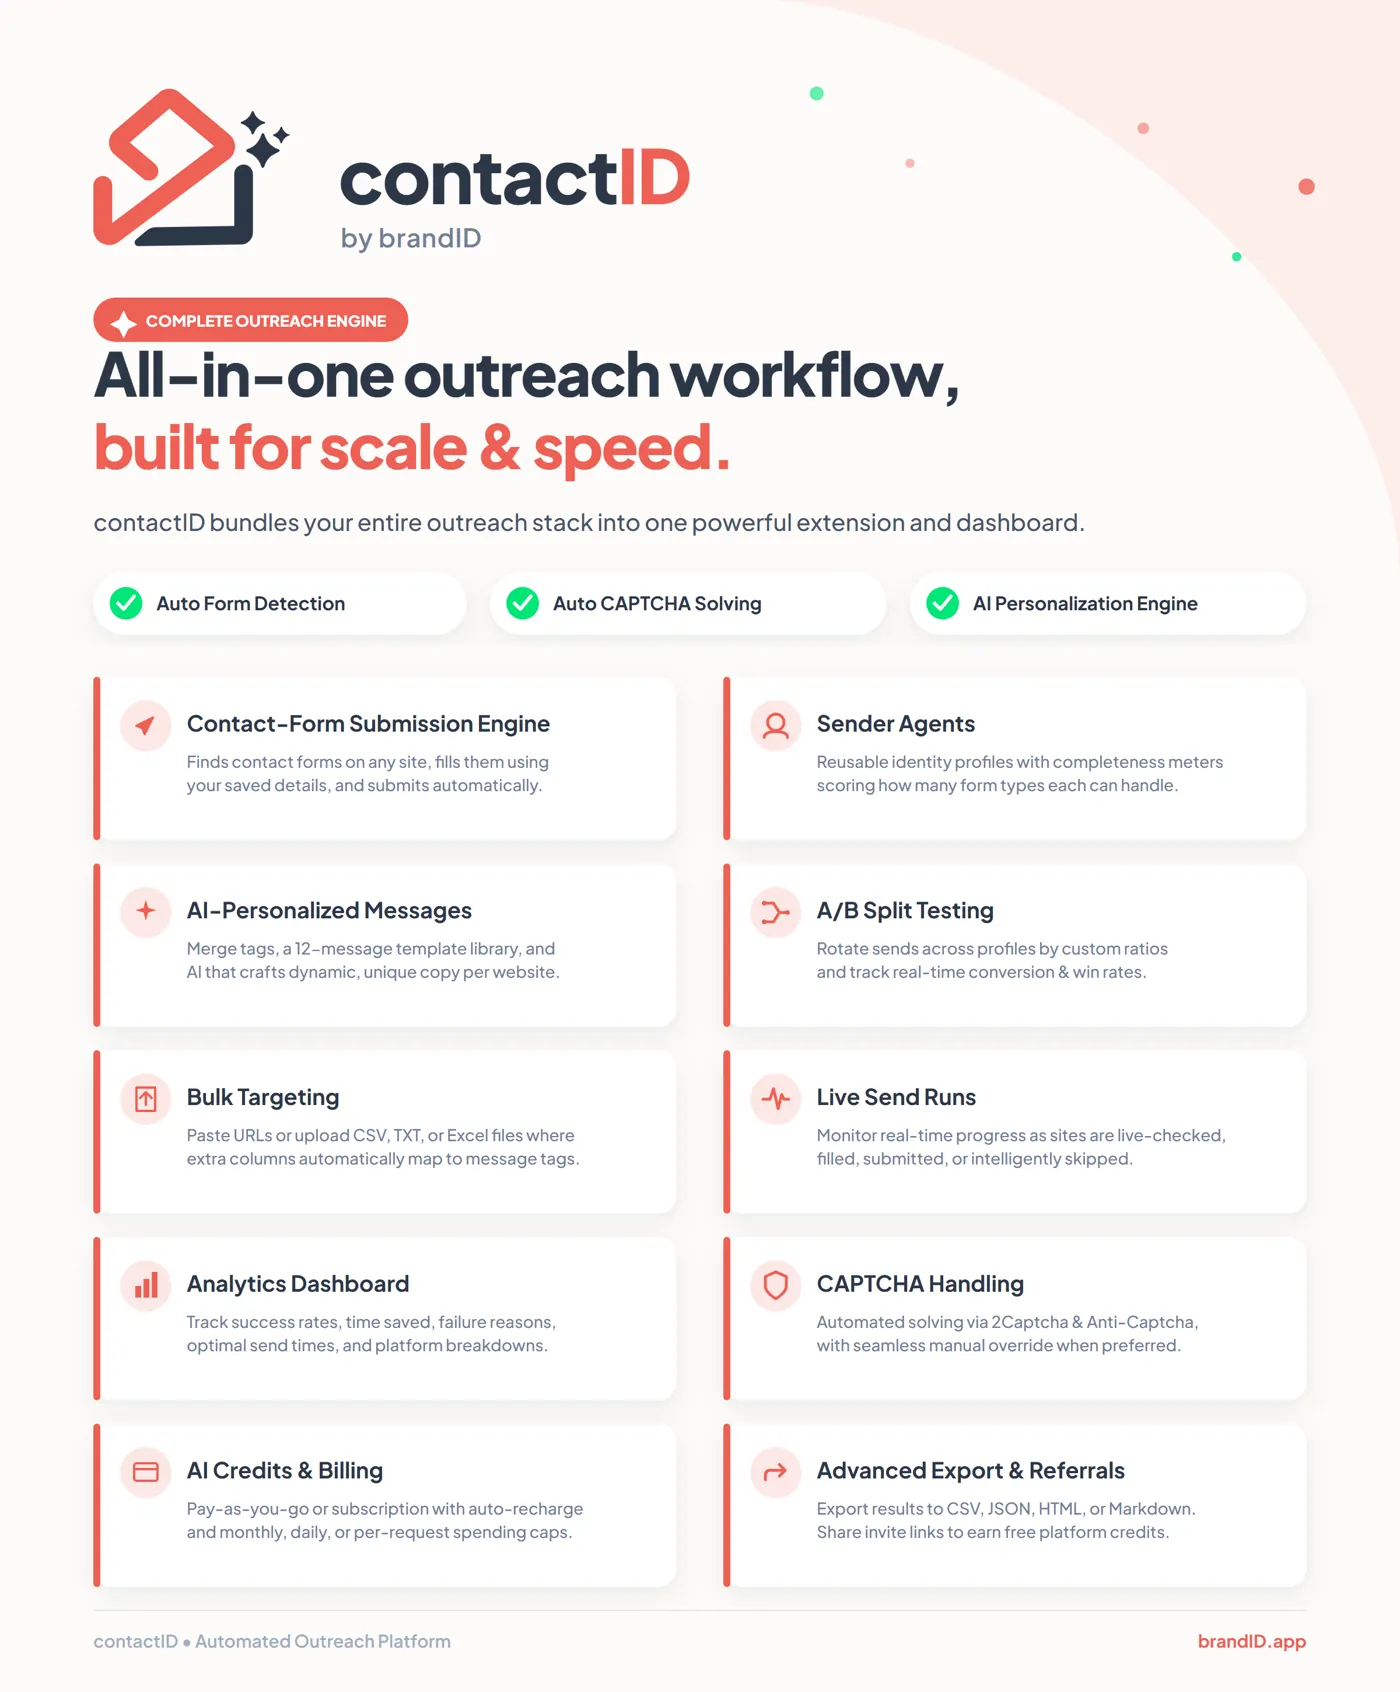
1. Getting Started With contactID
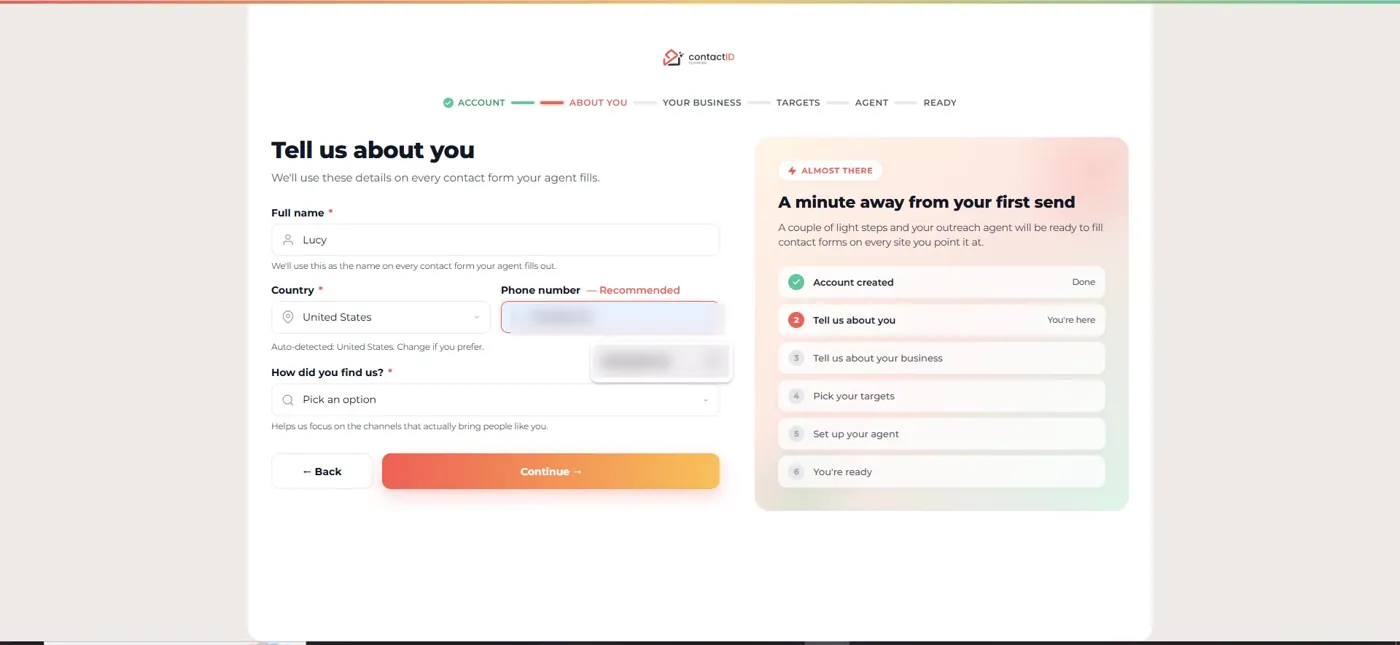
Setup takes a few minutes and ends with an agent that is ready to send. As one of the more capable best Chrome extensions for lead generation, contactID installs straight from the Chrome Web Store. The onboarding wizard is a six-step stepper: Account, About you, Your business, Targets, Agent, and Ready.
- Install contactID from the Chrome Web Store and pin the icon to your toolbar so the side panel is one click away.
- Create an account with Google or an email and password, then confirm the six-digit code sent to your inbox.
- On the Tell us about you step, add your full name, country, and phone number. contactID reuses these on every form your agent fills, so accuracy here saves edits later. The phone number is marked recommended because a share of forms require it.
- Add your business details on Tell us about your business: company name, website, and industry. These populate tags like {{company}} and {{industry}} in your messages.
- Choose how you will source websites: I have my own list if you already have URLs, or Help me find websites if you want a done-for-you, niche-targeted list built for you.
- When the wizard shows Your agent is ready, open the side panel and move to the Agent step.
2. How to Create Agents in contactID
An agent is a reusable sender profile. It holds your identity and the message that goes out, so you can point it at any list without retyping anything. You can keep several agents for different offers, personas, or languages, and switch between them per run. Agents live under Sending as at the top of the Agent step.
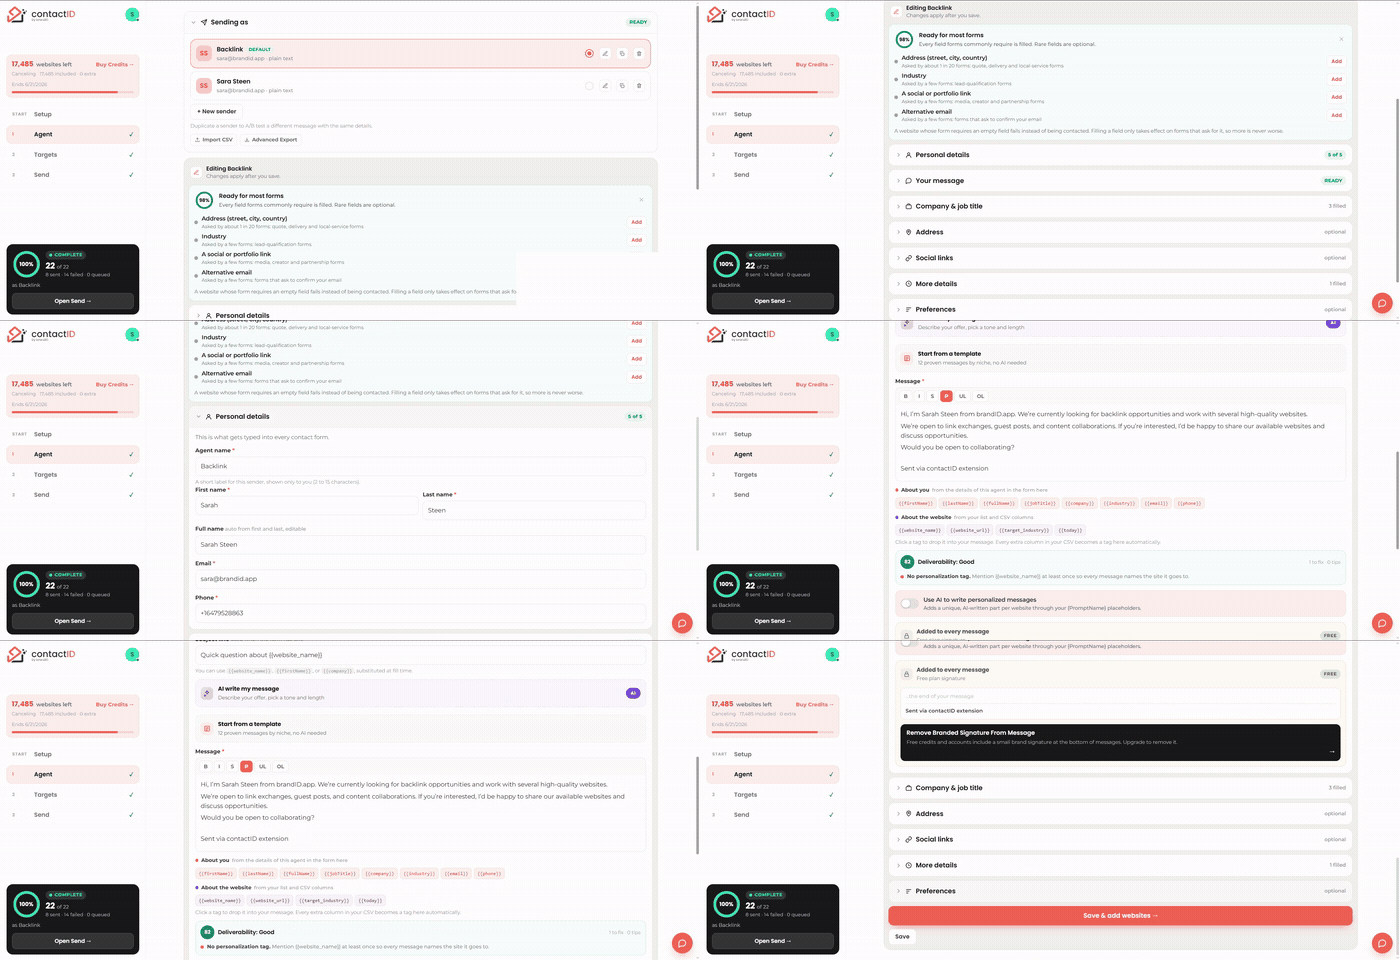
- In the side panel, open the Agent step and find Sending as.
- Click + New sender to start a fresh agent, or edit the default one.
- Fill the field groups in order: Personal details, Your message, Company & job title, Address, Social links, More details, and Preferences.
- Watch the Ready for most forms meter at the top of the editor. It scores how many forms your agent can complete as-is and points to the optional fields worth adding.
- Click Save (or Save & add websites) to store the agent. Your edits are not kept until you save.
The completeness meter is the part worth understanding. About one form in ten asks for something beyond name, email, and message: a website, a full address, a social or portfolio link, or an alternative email.
The meter flags each of those as an optional add, with a note on how often forms request it. A website is asked by roughly one form in ten, an address by about one in twenty.
Filling an optional field only helps. A form that never asks for it ignores it, while a form that requires it would otherwise fail, so more detail is never worse. Getting the meter to a high percentage is the easiest way to lift your success rate before you send anything.
3. How to Write and Personalize Messages
The message lives inside the agent, under Your message. You write it once with merge tags, and contactID substitutes the right values for each website at the moment it fills the form. There is a subject line that is used when a form has one, and a body that is used everywhere.
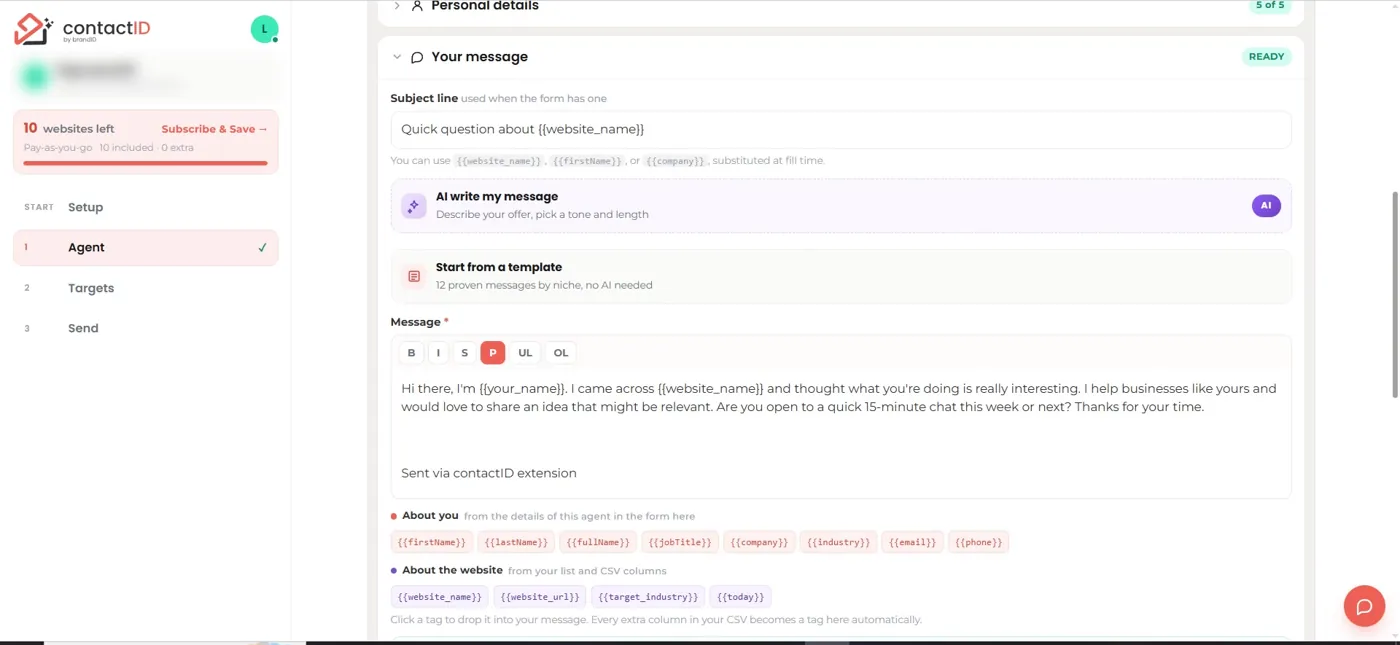
Two tag groups are available. About you pulls from the agent and stays constant: {{firstName}}, {{fullName}}, {{jobTitle}}, {{company}}, {{industry}}, {{email}}, {{phone}}. About the website is filled per site as it sends: {{website_name}}, {{website_url}}, {{target_industry}}, {{today}}.
Click any tag to drop it into the body or the subject. Every extra column in an uploaded list becomes a tag here too, so a spreadsheet with a City column gives you {{City}} automatically.
Three tools speed up the writing itself:
- AI write my message: describe your offer, pick a tone, a length, and a language, and contactID drafts the message for you.
- Start from a template: 12 proven messages grouped by niche, each with a live preview filled with your details. Categories cover SaaS and software, local services, e-commerce and wholesale, recruiting and staffing, PR and content, consulting, events and sponsorship, and a plain general option.
- Deliverability score: a running grade with concrete fixes. It rewards a very short message of one or two sentences, at least one personalization tag such as {{website_name}}, and one clear ask at the end, and it warns when a bracketed placeholder is still sitting in the text.
How to Use Personalized Messages
Personalization decides what actually goes out per website. On the Targets step, the What message goes out? panel gives three modes, and only one is active at a time.
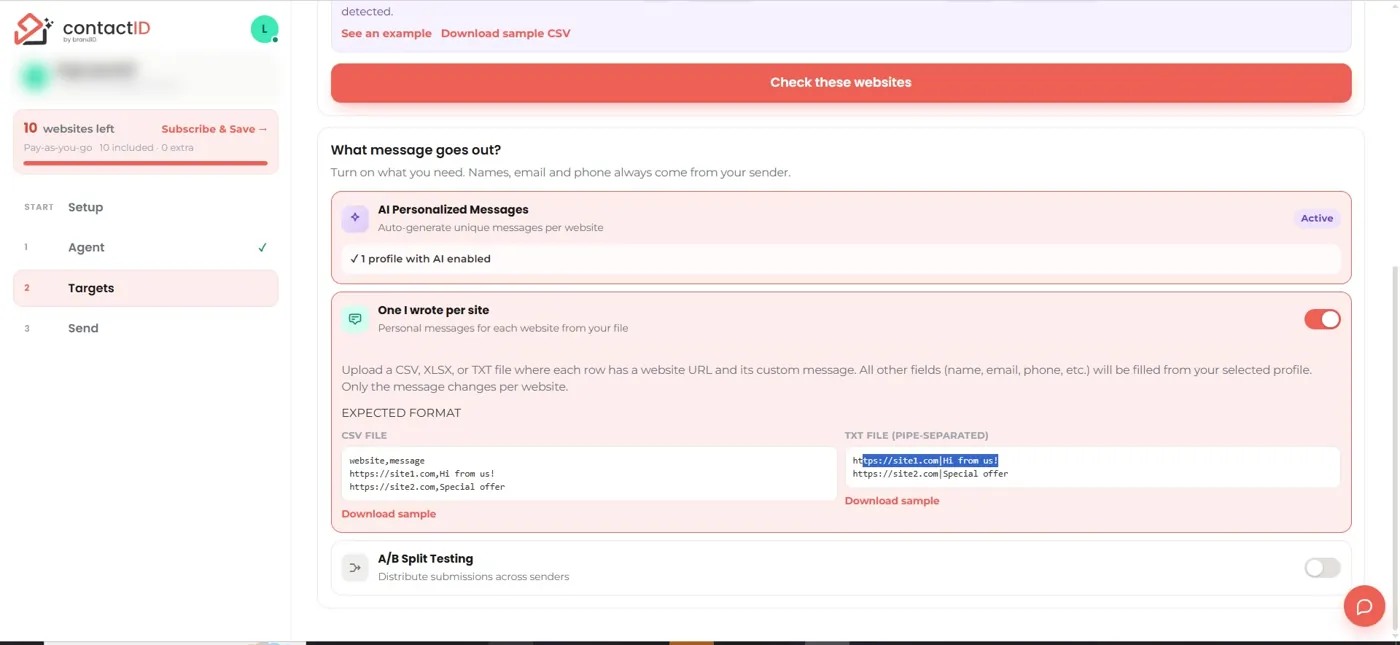
- AI Personalized Messages: contactID writes a unique message for each website using the model set on your profile. The panel confirms how many profiles have AI enabled.
- One I wrote per site: you supply per-website copy from a file. Upload a CSV, XLSX, or TXT where each row has a website URL and its custom message, and every other field (name, email, phone) is filled from your selected profile. Only the message changes per site. The expected format is a CSV with website,message columns, or a pipe-separated TXT like https://site1.com|Hi from us!.
- Send as written: the sender’s message goes out with tags substituted and no AI.
AI personalization is configured per profile on the AI Personalization page. You toggle AI on or off for each profile independently, pick a model, and edit the message template the AI expands from.
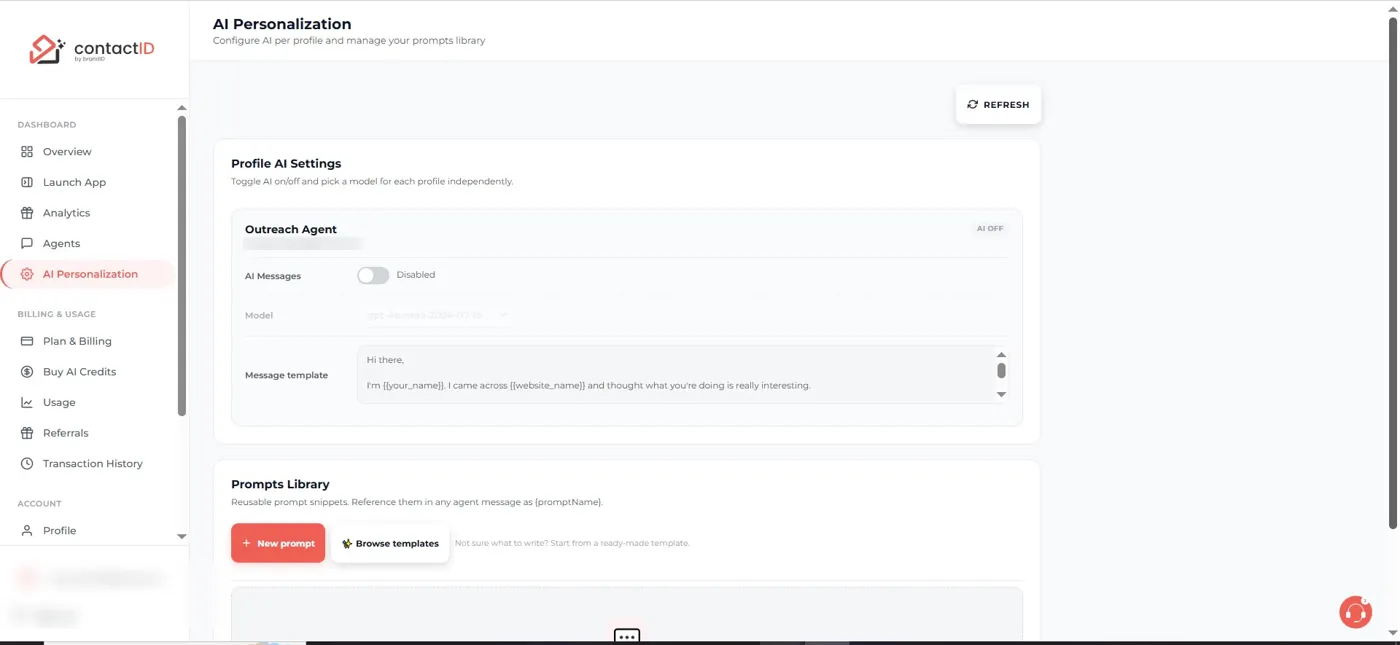
The Prompts Library is where AI personalization gets powerful. Prompts are reusable snippets you write once and reference in any agent message with a {promptName} placeholder.
For example, a prompt named {RestaurantHello} might instruct: write a warm, local-sounding intro to the restaurant at {{website_name}} under 60 words, no brackets in the output. Drop that placeholder into your message, and every site receives its own AI-written opening while the rest of your copy stays fixed.
To set it up:
- Open AI Personalization from the dashboard sidebar.
- Enable AI Messages for the profile and choose a model.
- Under Prompts Library, click New prompt or Browse templates, and write a tight instruction that says what to produce, how long, and in what tone.
- Reference the prompt in your message by its {promptName} placeholder, then turn on AI Personalized Messages on the Targets step.
4. How to Set Up A/B Testing
A/B testing compares different versions of your outreach so you can keep the one that performs. In contactID it works by rotating your sends across more than one of your own profiles.
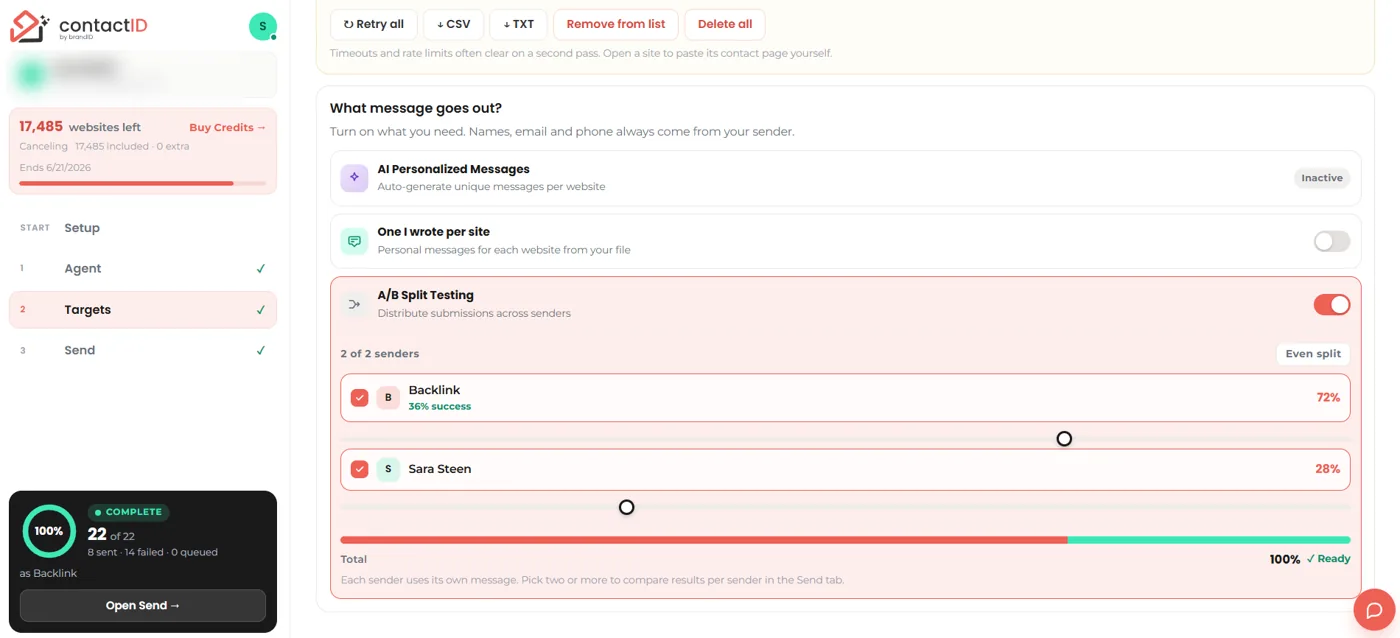
The idea is simple. If you set up different profiles and agents in contactID, you can choose to rotate sending your messages through them, and you decide how much of the volume each one gets.
- Under Sending as, set up more than one profile or agent, each with its own message. The other details can match or differ.
- On the Targets step, turn on A/B Split Testing to rotate submissions across those profiles.
- Set the percentage of messages you want to go through each profile, for example 60% through one and 40% through the other.
- Run the batch. contactID sends through each profile according to your split and tracks them separately.
Reading Your A/B Results
During and after a run, the Send step shows a live A/B results panel. Each profile lists its share of sends and its own success rate, for example one taking 61% of the volume and another taking 39%, each with its sent and failed counts.
contactID calls a leader when there is one, and reminds you not to trust it too early. Shift more of the split to the winner once the numbers are large enough, around 50 or more sends each, because small samples swing wildly.
5. How to Add Targets and Start Sending
Targets are the websites you want to reach. The Who should we contact? box accepts URLs or a file, and it is deliberately forgiving about format.
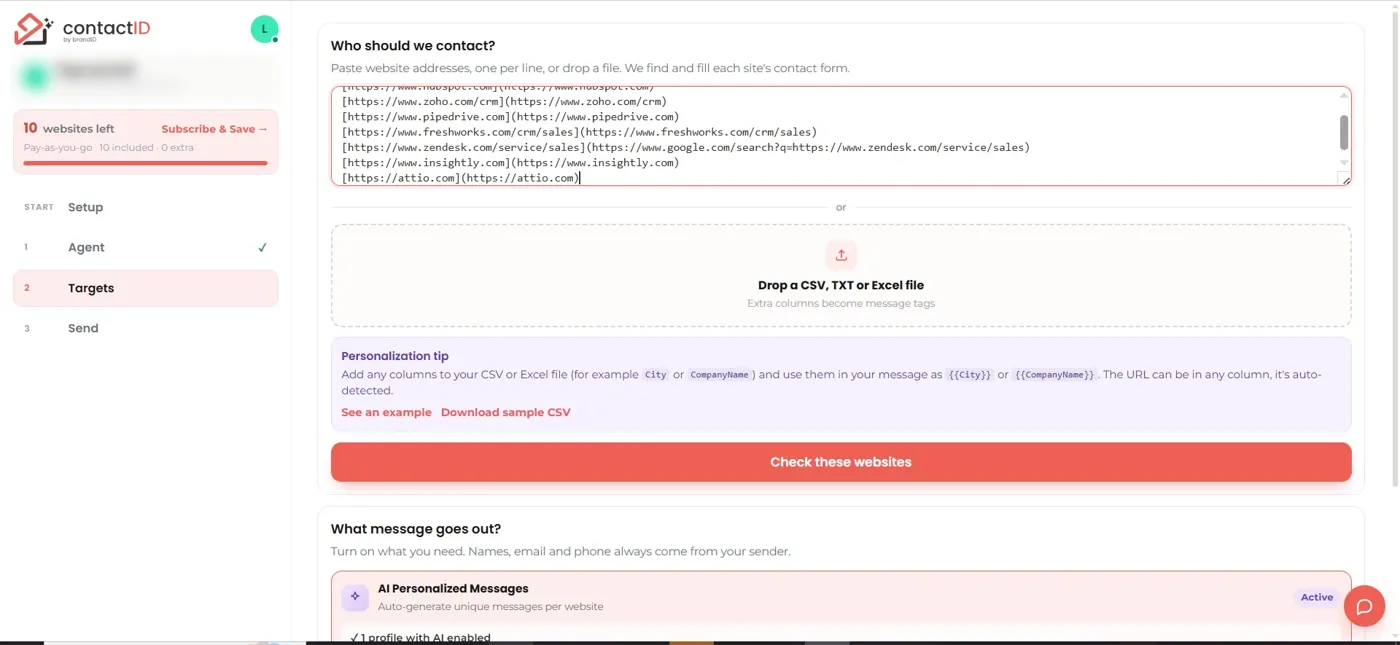
- Paste website addresses one per line, or drop a CSV, TXT, or Excel file. Extra columns become message tags, and the URL can sit in any column because it is auto-detected.
- Click Check these websites. contactID pre-scans each URL and sorts it into ready, no form, or to go, so you know what you are working with before spending anything.
- Move to the Send step and start the run.
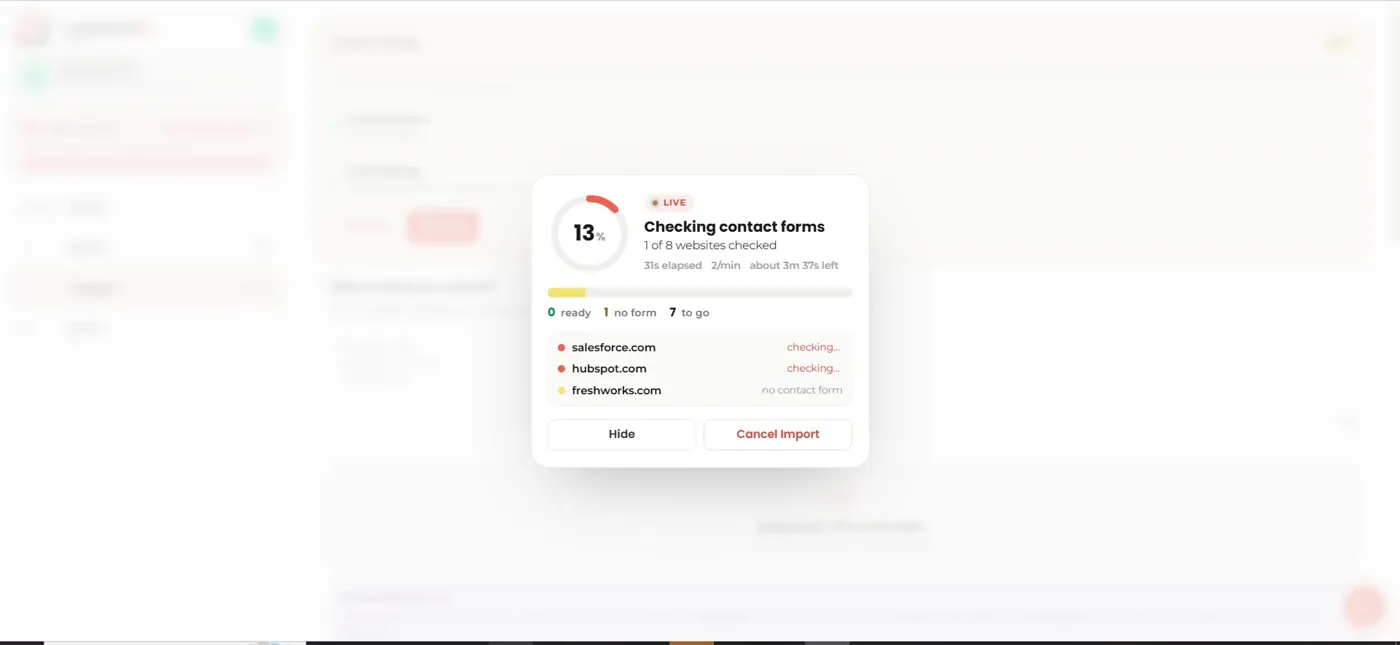
While a run is live, contactID shows a progress card: the percentage checked, how many of the total are done, elapsed time, the rate per minute, and an estimated time remaining. Each site reports its own status as it goes, and a site with no reachable form is marked and skipped rather than charged, so your budget goes to sites that can actually be contacted. You can hide the card and keep working, or cancel the import at any point.
6. How to Enable AI Credits and Auto-Recharge
AI credits pay for AI-written messages, and only for those. If you send with a fixed message or your own per-site copy, credits are not touched. The balance is spent as the AI writes, priced by the model you chose. Manage all of it under Buy AI Credits.
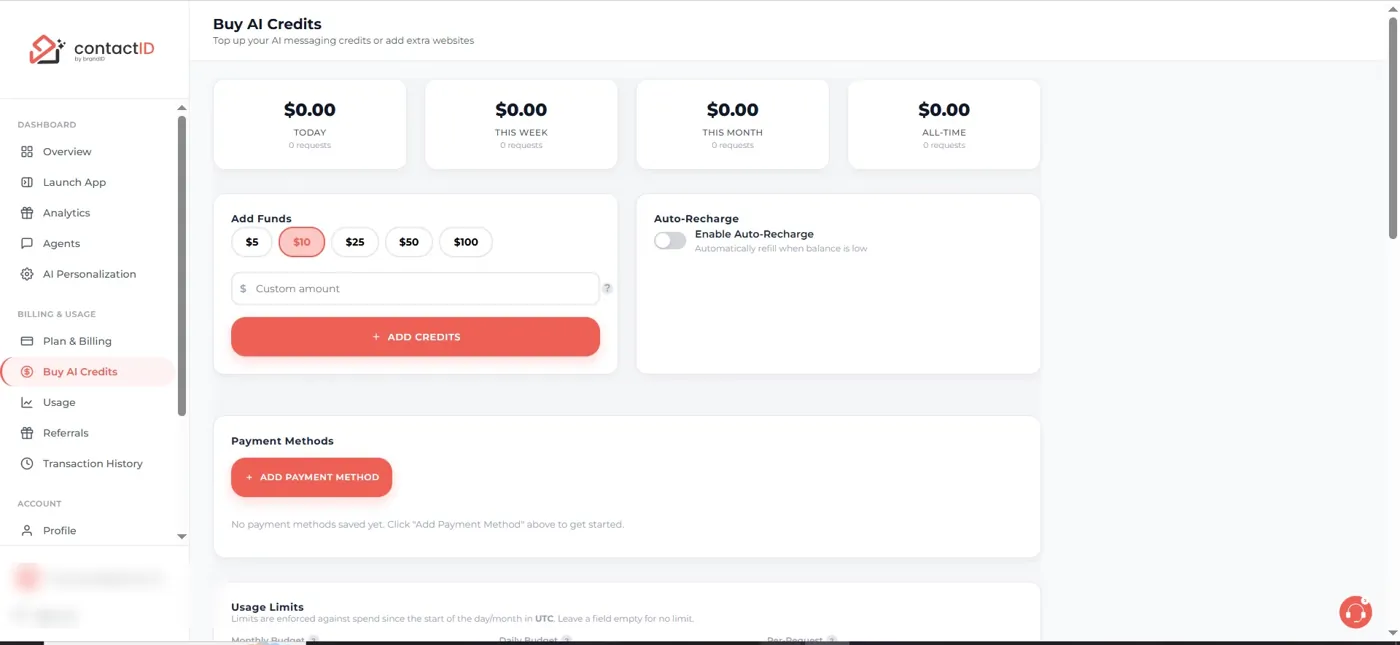
- Open Buy AI Credits from the dashboard sidebar.
- Click Add Payment Method and save a card.
- Pick a preset amount ($5, $10, $25, $50, or $100) or type a Custom amount, then click Add Credits.
- Turn on Enable Auto-Recharge so the balance refills when it runs low and a long batch never stalls halfway through.
- Set optional Usage Limits for monthly, daily, or per-request spend. Each limit can warn only or hard-block, which is worth setting before your first large AI run so a mistake cannot drain the balance.
The page also spends stats for today, this week, this month, and all time, so you can see exactly what AI writing is costing as volume grows.
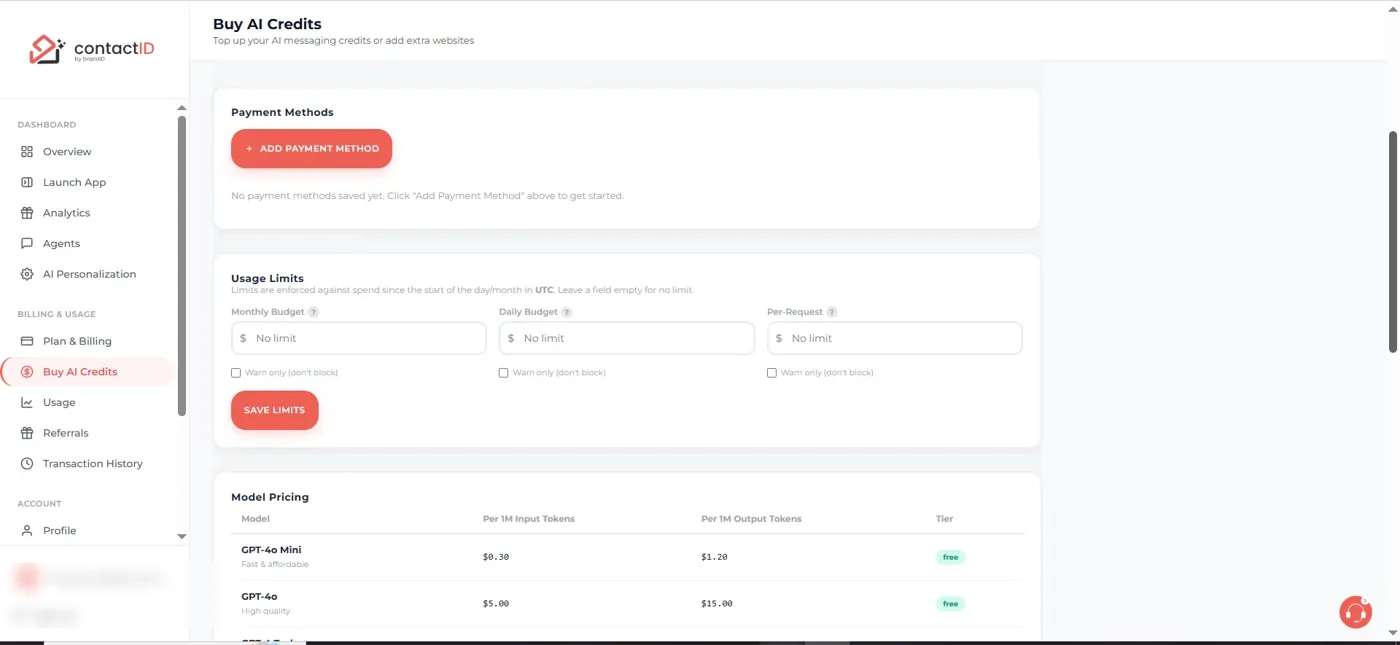
The Model Pricing table lists each available model with its price per million input and output tokens and a tier label. Cheaper, faster models such as a mini model cost a fraction of the larger ones and are usually enough for a one or two sentence opener, so match the model to the job rather than defaulting to the most expensive option.
7. How to Upgrade Your contactID Account
Free accounts add a short “Sent via contactID” line to the bottom of every message. Subscribing to any paid plan removes that signature automatically and lowers your cost per website. There are two ways to pay: a monthly or annual subscription, or one-off pay-as-you-go credit packages. Both live under Plan & Billing.
The billing works in your favor: you only pay for forms that are actually submitted. Sites with no contact form, and forms that fail during filling, do not count against your quota or your credits, so a wasted attempt never costs you.
Here is how contactID pricing compares across tiers, on annual billing:
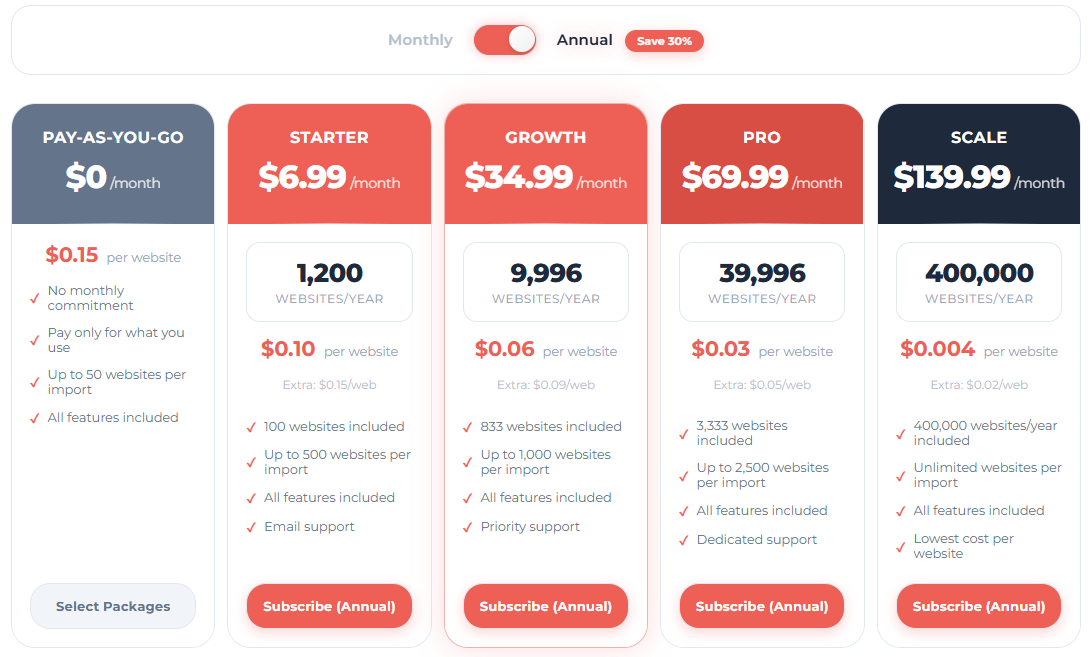
Two numbers matter per tier: how many websites are included per year, and how many you can import in a single batch. Higher tiers raise both and drop the per-website cost, from $0.15 on pay-as-you-go to $0.004 on Scale. Monthly billing is available at higher headline prices, and annual billing saves 30%. If you would rather not subscribe, the Pay-as-you-go Packages sell website credit in blocks, from a $10 pack up to $200, with bonus credit on the larger packs and a custom option.
- Open Plan & Billing and scroll to Choose Your Plan.
- Toggle Monthly or Annual, and check the per-website rate and import cap for the volume you actually send.
- Pick a tier and click Subscribe, then complete checkout. The signature line disappears immediately and your messages go out clean.
8. Reviewing Results and Analytics
The Analytics page turns every attempt into numbers you can act on, filterable by Today, 7 days, 30 days, 90 days, all time, or a custom range.
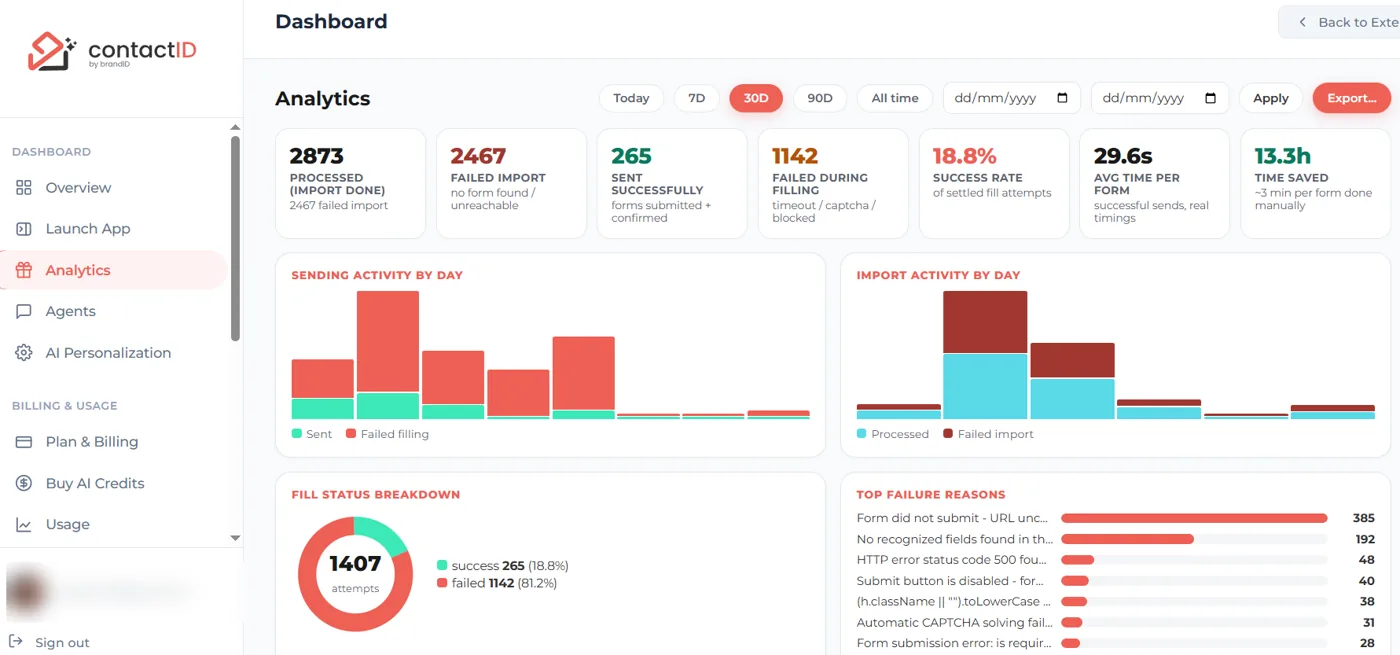
The top row of tiles summarizes the run: sites processed, failed imports, forms sent successfully, forms that failed during filling, your overall success rate, the average time per form, and the total time saved versus filling by hand.
Below that, charts break out sending and import activity by day, a fill-status donut splits success from failure, and a Top failure reasons list ranks what went wrong.
Further down, contactID surfaces your best days and hours to send, plus a Success by form platform breakdown. Low-friction platforms tend to convert far better than sites with strict validation, so it tells you which kinds of targets are worth more of your list.
Understanding Failure Reasons
Not every submission lands, and the failure list tells you why. The main reason is that a form asked for information your agent has not provided yet.
Some sites require a field, or a whole section, that you have not filled in, so the form cannot be completed and submitted. Raising your agent completeness, so it covers the fields forms commonly require, is the most effective fix.
A low success rate is almost always a targeting or completeness problem, not a dead end. It does not cost you either, because you only pay for forms that are actually submitted, never for sites that have no form or fail during filling.
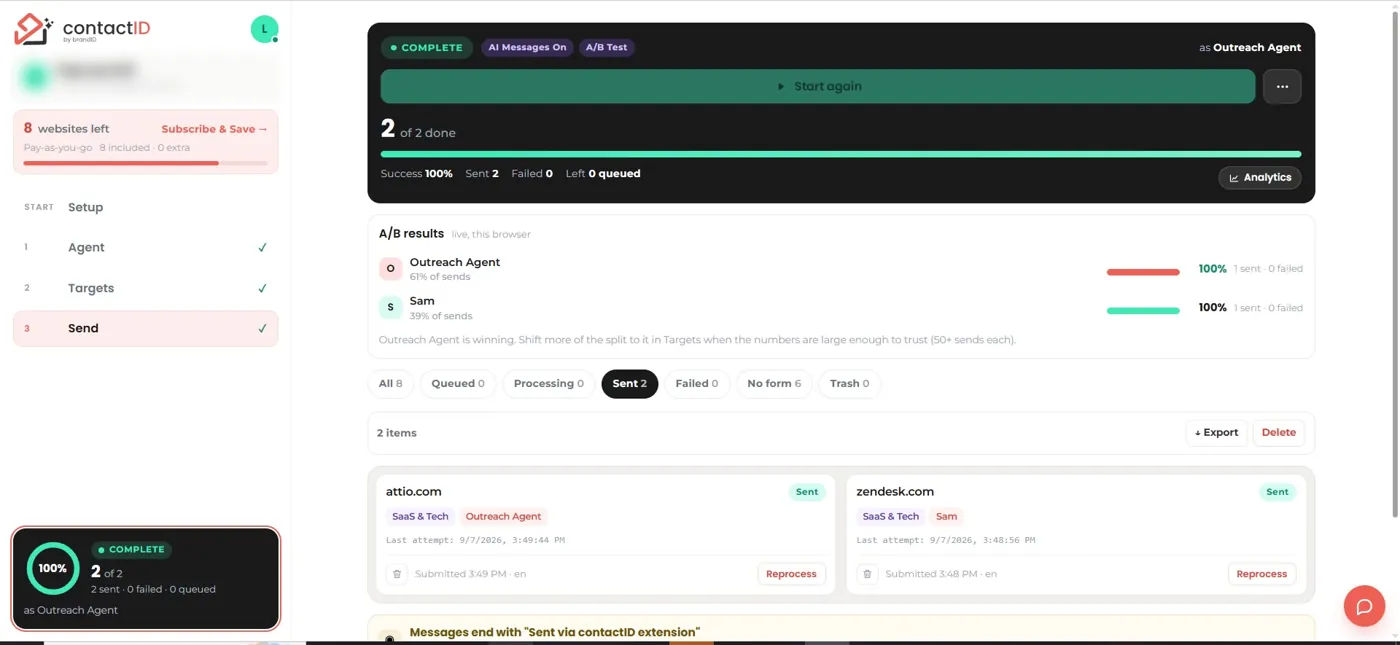
The log itself is filterable by Sent, Failed filling, Processed, and Failed import. Each row shows the website, its status, the tags and sender used, and when it was submitted, with a reprocess action to retry a single site. Use Advanced Export to pull the log out as CSV, JSON, HTML, or Markdown when you want to analyze it elsewhere or hand results to a client.
9. Settings, CAPTCHA, and Deliverability
The Settings panel controls how aggressively contactID runs and how it deals with CAPTCHAs, which some sites use to block automated submissions.
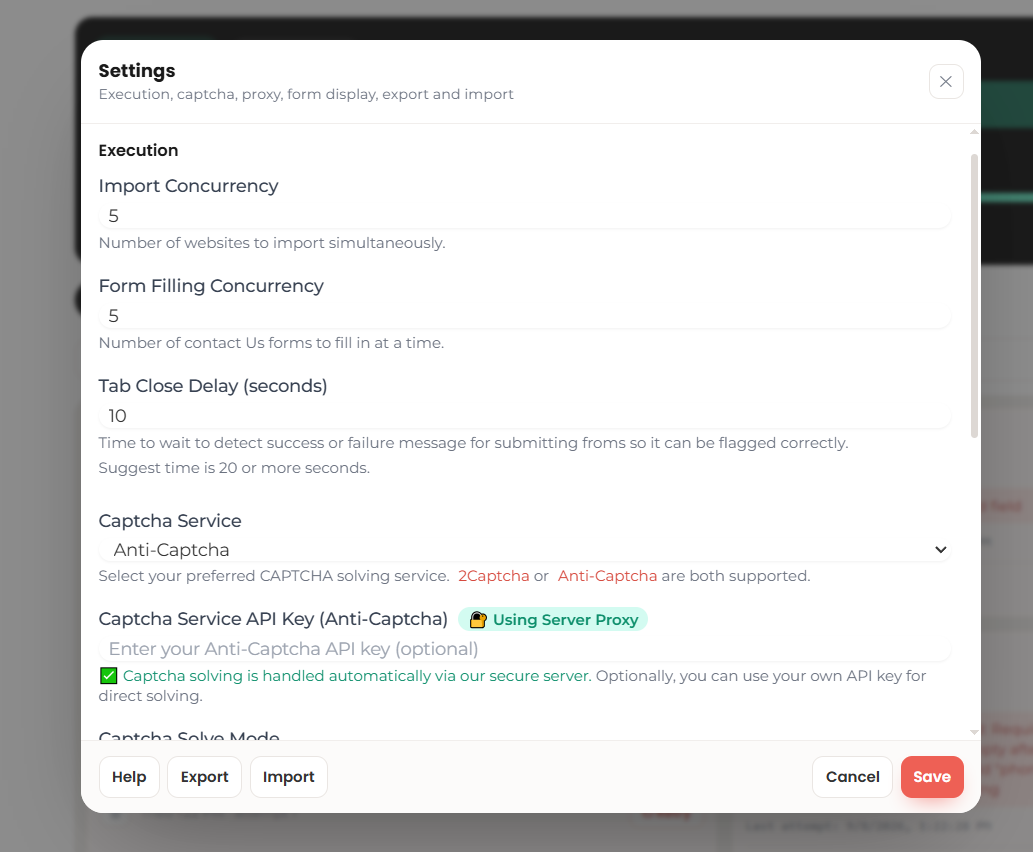
- Concurrency: set how many sites import at once and how many forms fill at once. Higher is faster but heavier on your machine and more likely to trip rate limits.
- Tab close delay: the wait before contactID reads success or failure. Twenty seconds or more is suggested so slow forms are flagged correctly rather than counted as failures.
- CAPTCHA service: 2Captcha and Anti-Captcha are both supported. Solving can run automatically through the built-in server, or with your own API key if you prefer to manage it directly.
- Solve mode: choose Automatic, which uses the API, or Manual, where you solve the CAPTCHA yourself when prompted.
- Proxies and form display: enable rotating proxies for submissions if you need them, and toggle which details show on the form cards during a run.
For the best results, combine a few habits. Keep messages short and specific, name the website at least once, and push your agent completeness high so more forms accept the submission.
Give the tab close delay enough room, and use your own analytics to favor the platforms that convert. Treat this like the outreach channel it is.
Respect each site’s terms and the messaging and consent rules that apply where you and your recipients are based, especially on forms that carry SMS or marketing consent checkboxes.
10. Tips to Get More From contactID
A few habits and a couple of lesser-known screens make a real difference once you are past your first run.
- Push agent completeness first. Filling the optional fields, a website, an address, a social link, and an alternative email, is the fastest way to lift your success rate before you send anything.
- Keep messages short with one ask. The deliverability score rewards a sentence or two, at least one personalization tag, and a single clear next step.
- Categorize each import. When you load a list, sort it into named categories such as SaaS and Tech, Local Business, or Agency Clients, so your runs and analytics stay organized.
- Tune concurrency to your machine. Higher import and form-filling concurrency runs faster but is heavier, so lower it in Settings if pages start timing out.
- Fix, then retry failures. The results log has Failed filling and Failed import tabs with a Retry action, so add the missing field to your agent and re-run just those rows.
- Send in your best windows. Analytics surfaces your best days, hours, and platforms, so weight future runs toward what already converts.
- Pair spend limits with auto-recharge. Auto-recharge keeps a batch from stalling, while monthly, daily, or per-request caps keep AI spend predictable.
- Watch Usage and Transaction History. The Usage page shows AI request volume and where credits went, and Transaction History lists every charge in one place.
- Keep Profile and Security current. Profile holds the details every form uses, and Security manages your password and connected email account.
- No list yet? Let contactID build one. The done-for-you option books a call and returns a verified, niche-targeted list, and your referral link earns free credits along the way.
Putting It All Together
contactID compresses a slow, manual channel into a repeatable system: build an agent once, write a message with merge tags or let AI handle it per site, load a list, and send while the extension fills and submits each form. A/B testing tells you which message wins, analytics show where attempts succeed or fail and which platforms are worth chasing, and credits plus plans scale the whole thing when you are ready.
Among best contact form automation tools, it stands out for pairing that submission engine with AI personalization. It is one of the outreach products brandID builds for people who would rather ship than copy and paste, and the fastest way to learn it is to run a small, well-targeted list and read the numbers it hands back.
FAQs
1- Is contactID free to use?
2- Does contactID send cold emails?
3- What are AI credits used for?
4- Which AI model should I choose?
5- How does A/B testing work in contactID?
6- Why did some of my submissions fail?
7- Can I upload my own list of websites?
8- How many websites can I contact?
 Summarize this article with: