
The Top Menu adds tabs across the top of your page, like Links, Products and Blog, so visitors can jump between sections instead of scrolling one long list. This guide shows how to turn it on, choose your tabs, pick which one opens first, sort your blocks into each tab, and style the menu.
Quick answer
In the editor, open Top Menu in Pinned Items, turn it On, switch on the tabs you want, set which tab is the landing tab, assign your blocks to each tab, then pick a menu style.
Before you start
- You need a page with a few blocks to sort into tabs. If it’s empty, start by adding your links.
- The Top Menu is on every plan, including the free Trial.
- Two to five tabs works best; more than that gets crowded on a phone.
Step by step
-
1
Open the Top Menu
On the Links & Products tab, find Top Menu in the Pinned Items row at the top, next to Social Channels. Click it to open its settings.

-
2
Turn it on and choose your tabs
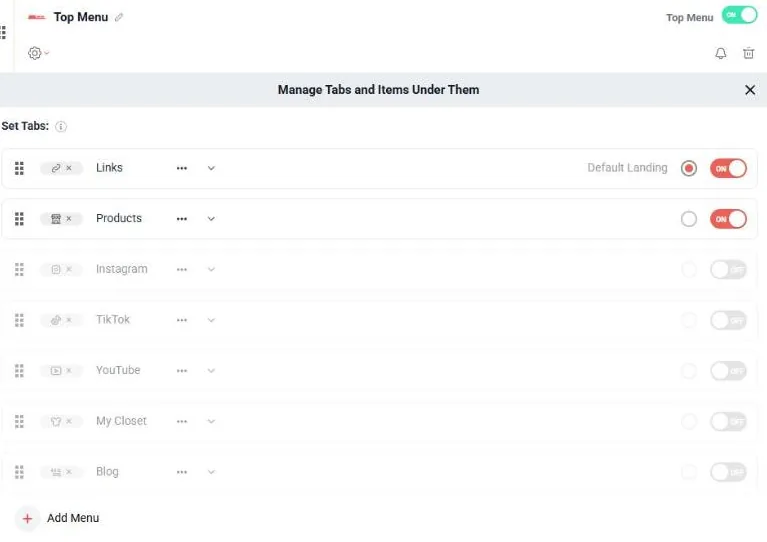
In Manage Tabs and Items Under Them, switch the Top Menu toggle On. Then turn on the tabs you want from the list (Links, Products, Instagram, TikTok, YouTube, My Closet, Blog), or click + Add Menu to create your own.
- Landing tab: the one marked Default Landing is what visitors see first. Click the circle next to a tab to make it the landing tab.
- Reorder: drag the dotted handle on the left to change the order of the tabs.
- Rename or manage: use the three-dot menu. Remove a tab with the x.
-
3
Put your blocks into each tab
Each tab is a section that holds its own blocks. Expand a tab with its chevron and assign the blocks that belong under it, so Products shows your products, Blog shows your posts, and Links shows your main links. A block that isn’t in any switched-on tab won’t appear on your page, so make sure every block you want to show lives under a visible tab.
-
4
Style the menu
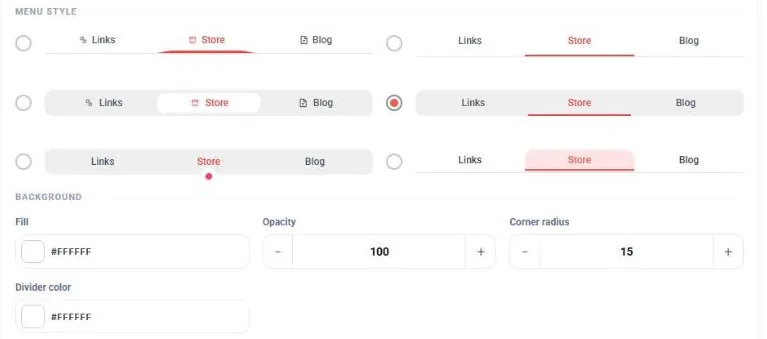
Scroll to Style and pick one of six looks under Menu Style: underline with icons, underline text only, pill background, underline in a container, dot indicator, or combined highlight. Then set the Background fill, Opacity, Corner radius and Divider color so the menu matches the rest of your page.
If something looks off
- A block disappeared. It’s probably not assigned to a switched-on tab. Expand a tab and add the block, or turn that tab on.
- The menu doesn’t show on your live page. Check the Top Menu toggle is On and that at least two tabs are switched on.
- The tabs look crowded on mobile. Remove or combine tabs and keep each name to one or two words.
- A change didn’t show. The editor saves on its own and shows All changes saved at the top. Refresh your live page to see the latest.
Key takeaways
- The Top Menu lives in Pinned Items; turn it on from Manage Tabs.
- Switch on the tabs you want, set a Default Landing tab, and reorder by dragging.
- Assign your blocks to tabs; anything not under a visible tab is hidden.
- Pick one of six menu styles and set the background to match your page.
Keep building
With your sections in place, round out your page by adding products to a tab, styling your buttons and fonts, and adding your social icons.