
Your background sets the mood of your whole page before anyone reads a word. brandID gives you four ways to set it, a flat colour, a two-colour gradient, an image or a video, plus overlay controls that keep your name and links easy to read on top. This guide walks through every option.
Quick answer
Open the editor, go to Design > Background, pick a type (flat colour, gradient, image or video), then set your colour or media. The page updates live as you change it.
Before you start
- You need a brandID page open in the editor. If your page is empty, start by adding your links first.
- Flat colour and gradient are on every plan, including the free Trial. Image and video backgrounds are part of a paid plan and show a small padlock until you upgrade.
- For an image or video background, have your file ready, or use a picture or clip from brandID’s built-in stock library.
Step by step
-
1
Open the Background settings
Switch to the Design tab at the bottom of the editor, then click Background in the row of design sections (next to Profile, Templates, Buttons and Fonts). The panel header reads Flat color, image, or video.
-
2
Choose a background type
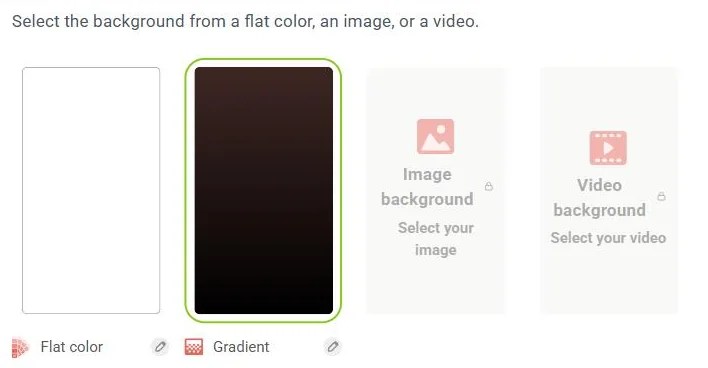
You’ll see four cards: Flat color, Gradient, Image background and Video background. Click the one you want. The padlock on Image background and Video background means they need a paid plan; Flat color and Gradient are free. The card with the green outline is the one your page is using now.
-
3
Set a flat colour
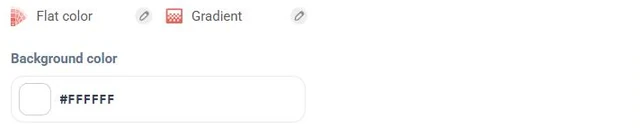
For a clean, single-colour background, pick Flat color and set one Background color. Type a six-digit hex code such as #FFFFFF, or click the swatch to open the colour picker and choose by eye. Pick a colour that fits your brand and leaves your button and text colours easy to read.
-
4
Or build a gradient
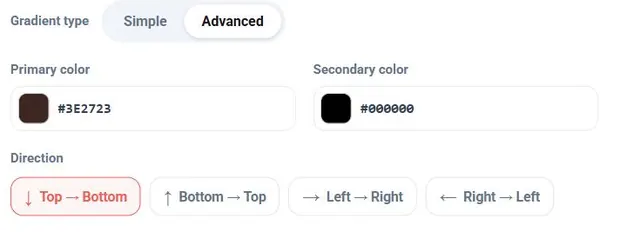
Pick Gradient for a smooth blend between two colours. Choose Simple for a quick blend or Advanced for more control, set a Primary color and a Secondary color, then pick a Direction: Top to Bottom, Bottom to Top, Left to Right or Right to Left. Two shades of the same colour usually read better than two very different ones.
-
5
Or use an image or video
On a paid plan, click Image background to upload your own photo or choose one from the stock library, then crop it to Portrait, Square or Landscape so it sits well on the page. Click Video background to upload a short clip or pick a stock video for a moving background. Keep video short and not too busy so your links stay the focus.
Keep your text readable
A busy photo or video can make your name and links hard to read. Two controls at the bottom of the Background panel fix that:
- Focus area background adds a solid panel behind just your content column, so your text sits on a clean surface while the image still shows around the edges.
- Transparent layer lays a tinted overlay across the whole background, with a Transparency slider to set how strong it is. A light overlay is usually enough to lift your text off a photo.

If something looks off
- Image and Video are greyed out with a padlock. Those backgrounds are part of a paid plan. Upgrade to use them, or stay with a flat colour or gradient, which look great and cost nothing.
- Your text is hard to read over a photo. Turn on Focus area background or the Transparent layer, and nudge the Transparency up until the text is clear.
- The colour isn’t what you expected. Check the hex code is a full six digits, for example #1F2430 rather than a short code.
- A change didn’t show up. The editor saves on its own and shows All changes saved at the top. Refresh your live page to see the latest.
Key takeaways
- Four background types: flat colour, gradient, image and video.
- Flat colour and gradient are free; image and video need a paid plan.
- A gradient takes a primary colour, a secondary colour and a direction.
- Use Focus area background or a Transparent layer to keep your text readable over an image or video.
Keep building
With the look set, round out your page by adding your social icons, restyling your buttons and fonts to match the background, and sorting everything into tabs with the Top Menu.