
Adding links is the heart of your brandID page. This walkthrough shows you how to add a link, give it a title and a URL, and get it in front of visitors. The whole thing takes under a minute, and you can keep adding links for every destination you want to share.
Quick answer
Open your page in the editor, click + Add Products/Links, choose Links, then type a title and paste your URL. Your link appears at the top of your page straight away.
Before you start
- You need a brandID page open in the editor. If you have not made one yet, start by creating your first page.
- The Links block is available on every plan, including the free Trial, so there is nothing to unlock here.
Step by step
-
1
Open your page in the editor
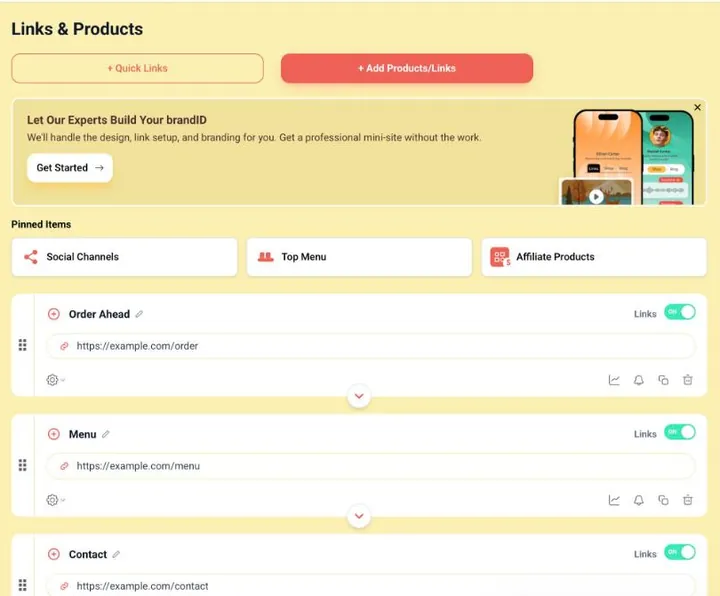
From your dashboard, open the page you want to work on. You land on the Links & Products tab, where every block on your page is listed. The two buttons at the top, + Quick Links and + Add Products/Links, are how you add anything new.
-
2
Open the items panel
Click + Add Products/Links. A panel opens with everything you can add to your page, sorted into groups such as Shop, Links and Content.

-
3
Choose Links
In the Links group, click the Links card. Use Links for a standard button that sends people to any web address. Custom Links let you build richer cards with images, and Websites is meant for your main site, so pick Links for a simple button.

A new link block appears at the top of your page, ready for a title and a URL. -
4
Add a title and your URL
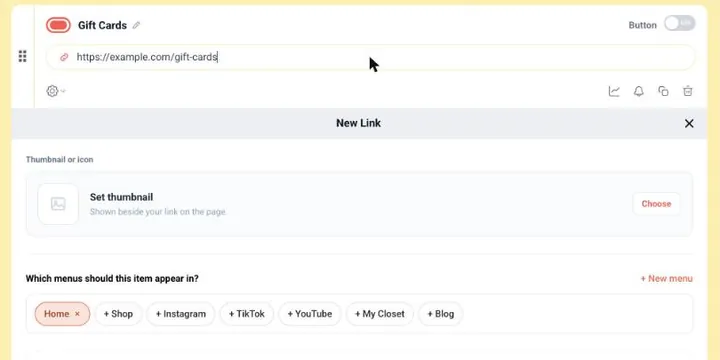
Click the title, which reads New Link, and type what you want the button to say, for example Gift Cards. Then paste the destination address into the URL field. Short titles of two to four words read best on a phone.
-
5
Your link is live on the page
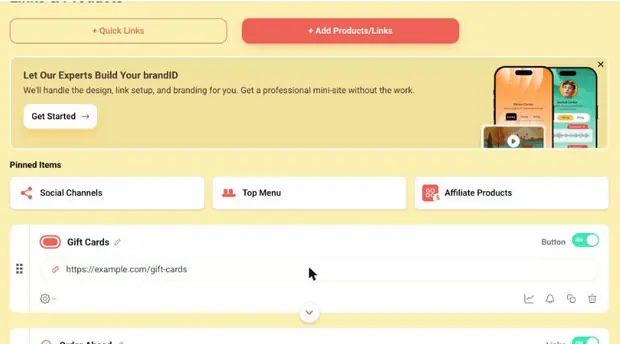
As soon as the URL is filled in, the setup prompt disappears and your link is saved. It sits at the top of your list with its toggle switched on, which means visitors can see it.
Fine-tune your link
Once the link is on your page, a few controls let you shape how it behaves:
- Drag the handle on the left of the block to move it above or below your other links.
- Flip the toggle off to hide a link without deleting it, then back on when you want it to return.
- Click Set thumbnail to put an icon or image beside the link.
- Under Which menus should this item appear in, pick the tabs where it should show if you group your page into tabs with the Top Menu.
If something looks off
- The link does not open. Check that the URL starts with https:// and points to a working page.
- Visitors cannot see the link. Make sure its toggle is on, and that your page itself is set to live.
- You have hit a link limit. Some plans cap how many links a page can hold. Hiding links you are not using frees up room, or you can move up to a plan with more.
Key takeaways
- Add a link from + Add Products/Links, then the Links card.
- Every link needs a title and a URL.
- Links are on by default. Use the toggle to hide one and the drag handle to reorder.
- The Links block works on every brandID plan.
Keep building
With your links in place, the natural next steps are adding your social media icons, restyling your buttons and fonts, and sorting everything into tabs with the Top Menu.