Letting your audience tip you is one of the simplest ways to start earning on brandID. With the Tipping feature, fans can support you with one-time payments through a video, image, button, or scannable QR code right on your brandID page.
This guide walks you through the full setup, from creating the tip jar to publishing it live.
Before you start: Make sure you’re logged in to your brandID account and on your dashboard.
Step 1 — Open Your ‘Links & Products’ Page
From the left sidebar of your dashboard, click Links & Products. This is where every section of your brandID page lives.
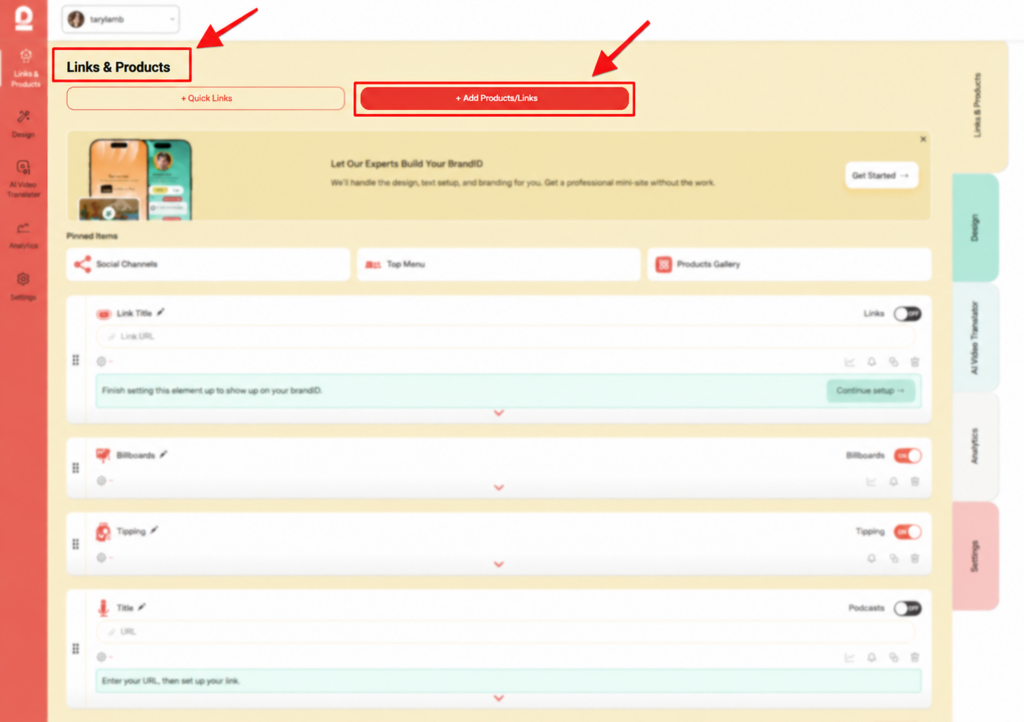
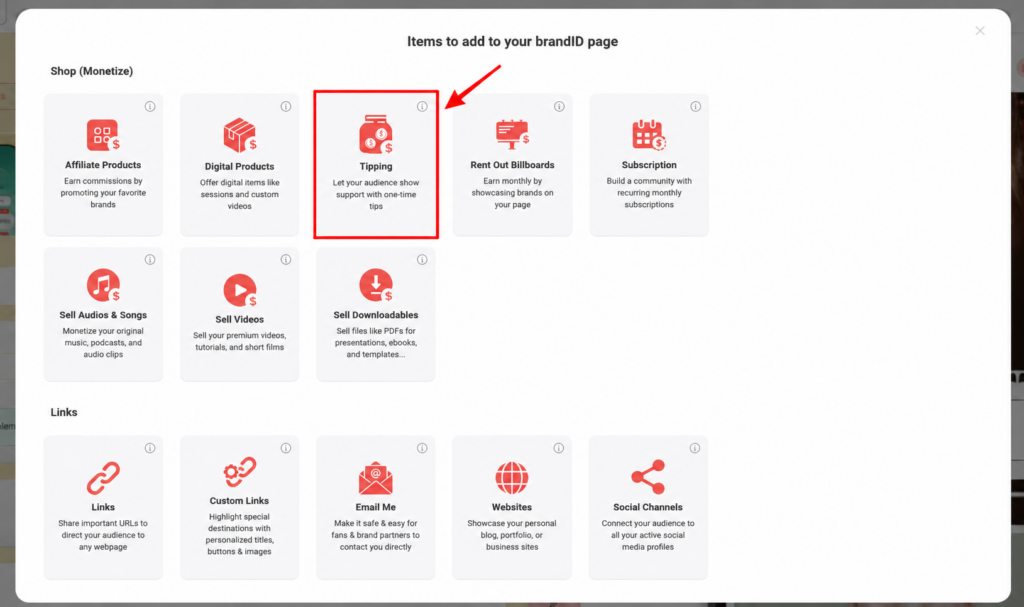
Step 2 — Add a Tipping Element
Under the Shop (Monetize) section, click the Tipping tile (the icon with the tip jar).
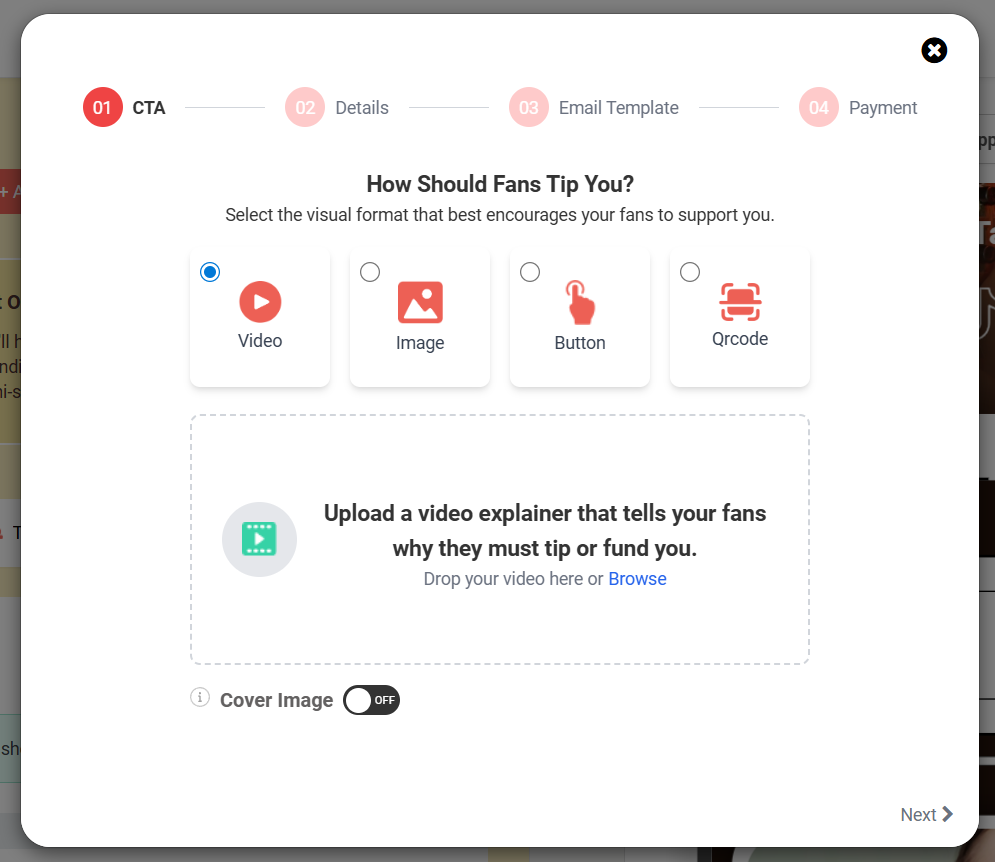
Step 3 — Choose How Fans Will Tip You (CTA)
On the CTA screen, brandID asks: “How Should Fans Tip You?” Pick the visual format that fits how and where your audience will discover your virtual tip jar:
- Video — Upload a short clip explaining why fans should tip or fund you. Best when you want an emotional connection.
- Image — Use a still photo or graphic. Clean and simple.
- Button — A clickable button on your page. Great for digital-first audiences.
- QR Code — A scannable code. Perfect for in-person interactions: street performers, servers, valets, and event staff.
If you choose Video, drop your file into the upload area or click Browse. You can also turn on the Cover Image toggle to show a custom thumbnail.
Click Next when you’re done.
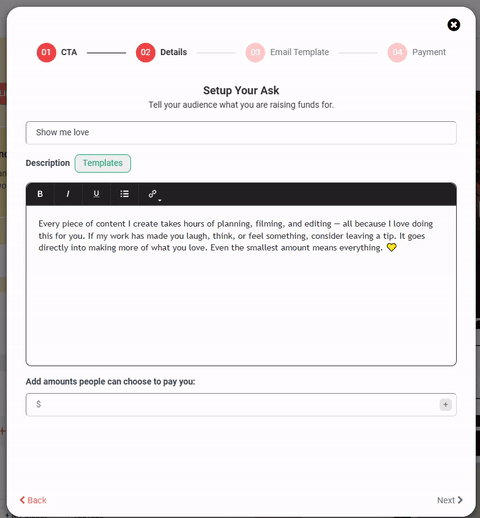
Step 4 — Set up Your Ask (Details)
On the Details screen, you’ll write the message your fans see.
- Name your tip campaign — e.g., “Support Me,” “Fuel My Music,” “Buy Me a Coffee.”
- Description — Tell your story. Use the formatting toolbar (bold, italic, underline, list, link) to style it. If you don’t know where to start, click the Templates button to browse pre-written descriptions for different creator types (General Creator, Educator, Musician, Fitness Coach, Comedian, and more — 10 templates total). Pick one and click Use Template to drop it into your description.
- Add tip amounts — Enter dollar amounts your fans can choose from (e.g., $5, $15, $25) and click the + button after each one. Each amount appears as a chip below the field. You can add as many as you want and remove any by clicking the × on the chip.
- Click Next.
Note: You must add at least one tip amount, or you’ll see a “Please set payment amounts” warning when you try to continue.
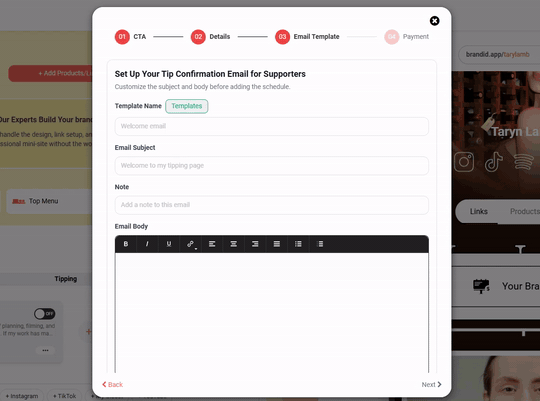
Step 5 — Set up Your Tip Confirmation Email
On the Email Template screen, you’ll create the email your supporters automatically receive after tipping.
- Template Name — Give your email template a name (or click the Templates button to load a pre-written email).
- Email Subject — Write the subject line, e.g., “You’re part of this now 🔒”
- Note — An internal note about who this template is best for (optional).
- Email Body — Write or edit the message. Use the formatting toolbar for styling.
- Variables — Click any variable chip to insert dynamic content into your email.
Step 6 — Schedule When the Email Is Sent
Scroll down to Schedule Settings.
- Enter a number in the Send after field.
- Choose a Unit from the dropdown: seconds, minutes, hours, or days.
- Click Add Scheduled Email.
For an instant thank-you, set “Send after 1 seconds.” For a delayed follow-up (e.g., a personal message a day later), set days/hours. You can add multiple scheduled emails to send a sequence of follow-ups.
Click Next.
Step 7 — Choose Your Payment Gateway
On the Payment screen, pick how you’ll get paid. You’ll see two options side by side:
Option A — My Own Payment Gateways: Use your own Stripe, PayPal, or both. If you don’t have an account yet, click the “click here” link to create new accounts.
Option B — brandID Payment Gateways: Use brandID’s built-in payment gateway — no Stripe or PayPal account needed.
Click Save Publish in the bottom right.
Step 8 — Customize how your tip jar looks on your page
Once published, you’ll return to the Links & Products page. Your tip jar element (“Tipping”) is now live with a green ON toggle. Below it, your campaign (e.g., “Support Me”) is listed.
Scroll down to fine-tune:
- Which menus should this item appear in? — Pick where the tip jar shows up: Links, Products, TikTok, Instagram, My Closet, or any custom menu you’ve created.
- Customize Style — Adjust:
- Layout Style: Background color, Stroke Fill, Alignment, Stroke Size, Radius
- Effect: Shadow color, Opacity, Blur
- Button: Background, Font Color, Font Size, Radius, Stroke Fill, Stroke Size
- Title: Font Color, Font Size
- Description: Font Color, Font Size
- Font Style
Step 9 — Add more tip campaigns (optional)
Want multiple virtual tip jars (e.g., one for tips, one for funding a project)? Click + Add New Tips next to your existing campaign. Each one runs as its own tip jar.
If you have more than one, scroll to Multiple Tip Jar Settings to choose:
- Layout (3 layout styles)
- Autoplay (Yes/No)
- Speed (e.g., 2000ms)
- Row count
- Show Arrows (Yes/No)
Step 10 — Preview and go live
Use the live preview on the right side of your editor to see exactly how your tip jar appears on your brandID page. The bottom of the preview shows a Live toggle — make sure it’s ON so your page is public.
That’s it — your tip jar is now live, and any visitor to your brandID page can support you in seconds.
Note: Make sure to add your brandID link to your social media accounts’ bios so your audience can find your online tip jar.